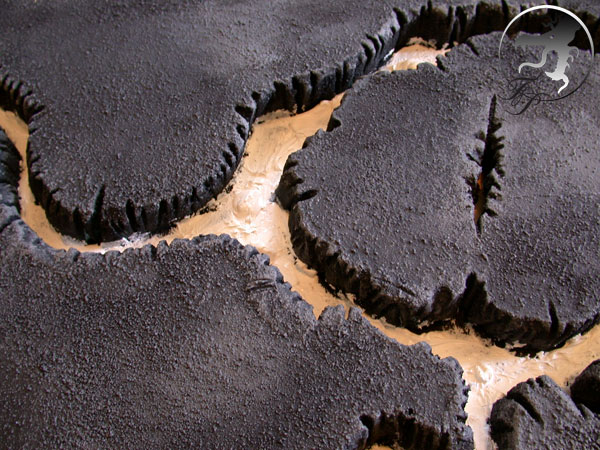
How to build a lava field gaming board
This tutorial will explain the steps to create a lava gaming board. These same steps can be used to create many other types of terrain too. Sorry if it is a little long. I figured more detail was better then less.
What you will need:
1. Dow foam insulation. This can be found at most construction supply depots. It comes in blue or pink sheets. It comes in 2’x8’ sheets, so you will need 2 of them.
(If you are having trouble finding it give this web site a look and call them and they can point you in the right direction. Either for ordering it or a local dealer. http://www.layoutvision.com/id44.html)
2. 3X 2’x4’x ½” pre-cut plywood sheets. These can be purchase at any Home Depot type store.
3. Heated wire foam cutter and Hot Knife.
4. tubes of subfloor glue.
5. 2+ tubes of ACRYLIC latex caulking.
6. 1 caulking gun.
7. 1 plastic tarp to work on.
8. 1 long bladed utility knife or kitchen knife.
9. 1 bag of play yard sand. These can be purchase at any Home Depot type store.
10. 1 sheet of ¼” masonite board.
11. 1 quart of black latex wall paint
12. 1 bottle of cheap white acrylic craft paint
13. 1 bottle each of yellow and dark red/orange cheap acrylic craft paint.
14. 1 sharpie.
15. Something to cut masonite boards with. I used a Jigsaw.
16. Sandpaper to smooth the edge of the masonite templates.
17. 1 large paintbrush and 1 medium sized one for painting the lava rivers.
18. 1 small can of Drywall patching compound.
Step 1:
Take your 2 sheets of foam and lay them out. Cut them each equally in half so you have 4 2’x4’ sections. Make sure to measure you precut plywood sheets to make sure they are actually the right size to match the foam you are going to cut. If they are a little off make sure to adjust your cut on the foam to match.
Once you have your cut line drawn on the foam use a long straight edge and cut the foam with the utility knife. Do not use the heated cutters as it will distort the edge.
This will leave you with one 2’x4’ section leftover to make hills and other terrain out of.
Step 2:
Lay out your boards edge to edge and draw the pattern you will want for the lava channels and any other features you will want to cut into the foam board. Take a good look at it once you have drawn out what you want. Keep in mind that you are doing to want to be able to play on this board. So make sure you do not make it to busy.
Grab your hot foam cutter(s) and start working on cutting out the pattern you have made. If you do not have a straight hot knife you will need to use the utility knife to get to the sections you can not get with the hot wire easily.
As I was cutting stuff out I numbered the “little islands” so I would know where they go after.
Once everything is cut out you are left with smooth edges, which you don’t want. Take the hot knife (or the wire cutter) and score the edges to make it look more like a broken lava field.
Step 3:
Now that your board is all cut out and the edges are “textured” get out the subfloor glue and get it loaded up in the caulking gun.
Flip your boards over and apply the subfloor glue to the back. Make sure that all the areas near and edge have glue so the foam will not be able to pull up from the wood boards. Once it is well coated flip it over onto one of the wood boards and press it down.
Finish gluing the other 2 boards and stack all 3 of them one on top the one another with the wood backings facing up. Now that they are stacked put a bunch of heavy stuff on top and let it sit over night so that the glue will have plenty of time to dry.
Step 4:
Now that it is the next day and the glue is dry it is time to texture them. You will need your large paintbrush, the black latex paint, the sand and a tarp to work on.
First lay the tarp on the floor so you will have somewhere to collect the sand as it falls off the boards. Lay the boards on the tarp and brush on a thick coat of paint onto the top flat surface of one board. Once that is done, poor the sand onto the paint you have just put down. If it is particularly warm you may want to do a small section at a time.
At this time I also painted all the little “islands” and put sand on them too.
Once the first board is done, repeat the steps on the other two boards. They will need to sit for a few hours to let the paint dry all the way.
When you come back in a few hours tip the boards over onto the tarp to get all the loose sand off. Use the tarp to poor the sand back into the bag or a container for use later.
Now you need to paint the vertical edges of the lava field and put sand on them. Be careful not to get too much paint down on the lava channels. You can cover up the little bits of sand that will stick down there when you do the lava itself. Once all this is done and had had a chance to dry go ahead and shake off the sand again and put the extra back in the container.
Step 5:
Now it is time to apply a coat of latex paint over all the sand to seal it in. Grab your large brush and give all the sand a good coat of latex paint. Make sure to pay attention to getting paint in all the little cracks you make along the lava channels. Also paint the outside edges of the boards at this time.
This will last step will take a while to dry so lets move on to making the movable terrain (if you had not started it already).
Step 6:
First we will start with the masonite board. You will be using this to make templates for your forests (Burnt out husks of trees) and any other rock outcroppings and lava cinder cones.
Draw out the shapes of the templates on the masonite board and cut them out with the jigsaw. Once they are cut out take your sandpaper and smooth out the edges.
For this board I cut out of the blue foam rock outcroppings and some cinder cones. Once these are cut out any that need templates will get glued onto them with the subfloor glue. Take the Drywall patch and use it to fill all the gaps along the bottoms of the foam and masonite.
Also cut out some hills and some small flat “sheets” of rock, that will be used for bridges over the lava rivers, from the left over sheet of blue foam.
Once the glue and plaster patch is dry go ahead and paint with the latex paint the areas of anything that you will want to have “sand” on them and cover them with sand.
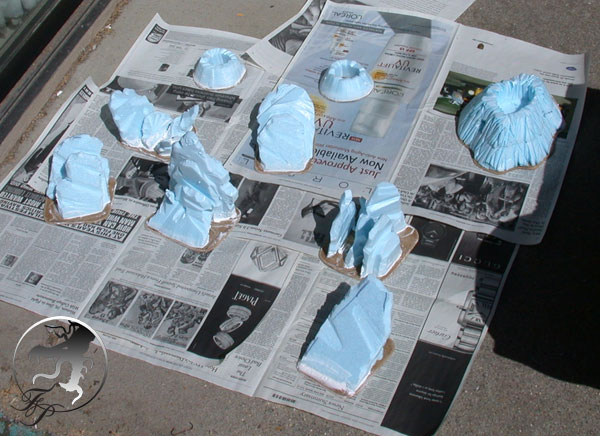
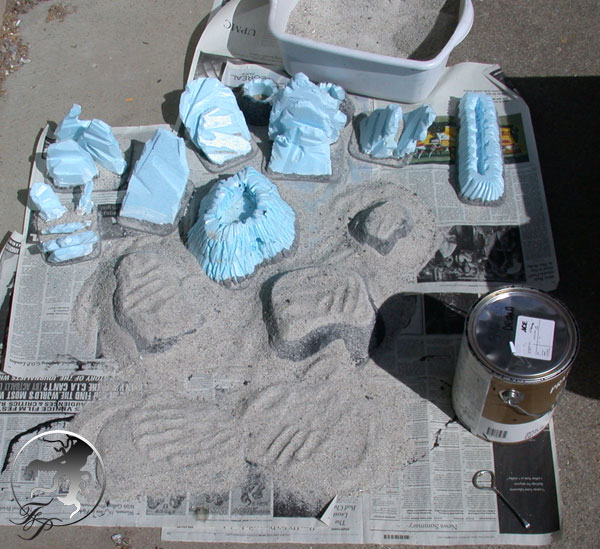
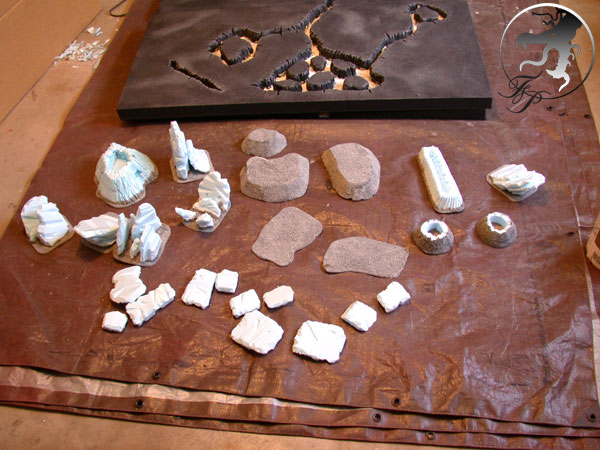
Once that first coat of paint and sand is dry clear off the excess sand and paint everything black. This will seal in the sand and also give you a black base coat to work up from for the rocks.
Step 7:
Now we will go back to the boards that have dried and work on getting some “color” onto them. You will want the large brush, black and white paint and some newspaper or other surface to mix the paint on. First, mix up a medium grey and drybrush* the boards and your mobile terrain pieces this grey.
*Drybrushing is a painting technique of wiping most of the paint off a brush, so as you paint the brush will only leave paint on the raised surfaces, as there is a minimal amount of paint on the brush being used.
Next, lighten the grey paint with a little more white and paint the edges and some patches on the boards and moveable pieces with this. Then take an even lighter shade and get just the edges of the lava rivers and the movable terrain pieces.
Now all the boards and pieces should be finished with as much grey and white as you like.
Step 8:
Now we are going to me making the lava. You will need the Acrylic caulking and a medium small paintbrush for this.
What you are going to do is lay a large bead of caulking down the middle of the lava rivers and any other place where you will want lava. Once that is done, take the paint brush and spread out the bead of caulking. Sometimes you will need to dip the brush in some water as the caulking can get quite thick and sticky and will need to be thinned out aome. Give it a rough texture so it will look like a rough lava flow. Do the same for any mobile terrain pieces you also may have made that have lava on them.
If you want to make some “lava bubbles” go ahead and put a dollop of caulking down and smooth it into a bubble.
This will take up to a full day to dry depending on how thick the caulking is.
Step 9:
Now that all the caulking is try it is time to paint up the lava.
First you will start with yellow paint and a medium brush. Paint all the lava yellow. Once this is all done go ahead and heavily drybrush* the lava the red/orange color.
Once the orange is dry, mix some of the black paint with some orange paint and drybrush* it onto the tops of the lava. This will give you the look of lava that has cooled somewhat on top. If you want it to look even cooler you can use more black as an additional coat of paint.
Now that all the lava is painted you will want to recreate the glow that hot lava radiates onto the adjacent rock.
Take your medium paint brush and the orange/red paint and drybrush* it onto the walls adjacent to the lava. Also drybrush orange strips onto the bottom of the “bridges” for the lava that would be glowing up at them.
Step 10:
Go Play! You are done!
Here is the section on making trees. I also have included it in the OP. Enjoy!
Step 1:
This part of the tutorial that will cover how I created the burnt out trees.
What you will need:
1. Plaster Cloth
2. Bases to mount the trees on (I used the flat 60mm GW bases)
3. Armature wire (Or some other easily bendable thicker wire)
4. Wood Glue
5. Sand for the bases
6. Red, Orange, Black and Gray Paint (Or white to mix with black)
7. Knife to cut the Plaster cloth
8. Bowl to fill with water
9. Wire cutters/pliers
10. Paint burshes
Step 1:
Cut 8x 8” sections of wire for each tree you want to make.
Each 2 wires will make one branch, so if you want more or less branches add or subtract 2 wires.
Bunch up your set of wires for a tree and grip them with the pliers twisting the wire to create the trunk. After you have a long enough trunk, go ahead and twist out the branches. After you have twisted them out, bend them around enough to look like a gnarled tree. Trim the “roots” so that they fit on the base you are using.
Repeat this as many times as you would like trees.
Step 2:
Warning: This will make a huge mess. Either, do it when you parents/spouse are not home, or give them fair warning that you are going to clean it up.
Cut an 1” to 1.5” strip off the Plaster Cloth
Fill a bowl with water and get one of your trees. Submerge the plaster cloth for a second then remove it. Do not squeeze it out. I would recommend doing this somewhere where it will not matter if you drip plaster all over the place. I used the kitchen sink (don’t tell my wife!). Start wrapping it around your armature until you have covered it all. You may need to cut multiple strips to cover the whole tree. You can also press it down and smooth it out in areas as needed. Do not move to slowly either as the plaster strip can harden on you while you are working with it. Repeat this until all the trees are wrapped
Once they are all wrapped up set them aside to dry for a few hours.
Step 3:
Once your trees are dry it is time to mount them. I drilled a few holes in the base so that it would be easier for the glue to adhere to them.
Next, spread some wood glue on the bottom of the tree and plop it down on the base over the holes
This will take a while to dry, but will be very strong once it is dry. After it is dry spread glue on the rest of the base and dip it in sand to texture it. Do this to all the trees and set them aside to dry.
Step 4:
Once this is all dry, get out your paints. First off I painted them red then let it dry, then painted parts of them orange. This is to achieve a glowing charcoal log look once you are done.
Once all this is dry, dry brush them black and also paint the bases.
Once this is all dry, dry brush them varying shades of gray to give them the cooling ash look. When finished should have a tree that looks like it has been set on fire and all that is left is a burn out husk that is glowing from within.
I then coated them with 2-3 layers of clear coat as paint will chip off plaster fairly easily when they rub together in a storage box.
Enjoy!
