
Painting a Tyranid Flying Hive Tyrant Golden Demon winner
Here is a tutorial on how I painted my Forge World Flying Hive Tyrant.
First off I had to clean the resin model with warm soapy water to get all the residue off of it that was left from when it was cast. Next up was the required cleaning and touching up of the miniature. Typically you will find a lot of flashing and a few small holes that are left over from the casting process that will need to be cleaned up and patched.
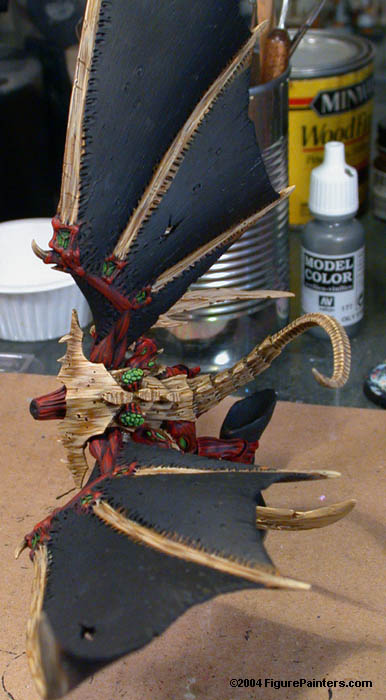
Next came the assembly of the figure. I had originally decided to do something a little more dynamic to the model. So I used my blow dryer to heat up the wings and tail so that I could bend and reposition them to something I liked a little better. Also the Venom cannon had to go... so I made two new scything talons that were appropriately sized for this model. The normal "large" scything talons that GW makes are too small for something this big. Some of the other additions to this include; poison sacks (on the arms), adrenal glands (for extra BS and I. Mounted on the back) and implant attack (the things coming out of its mouth). I also put some holes in the wings to make it look like he was not fresh out of the spawning vat. Of coarse every thing also gets pinned in place. This will insure that the model will be strong enough to play with later. Below you can see the pictures of it at this stage after it had been primed.

The "silver" model on the base was glued there to provide extra stability until I was finished paining and ready to mount the figure to the display base. Though the model will stand on its' own, I swear! What I should have done in retrospect was make the spore chimney that he is leaping off of out of lead to counter weight the model.

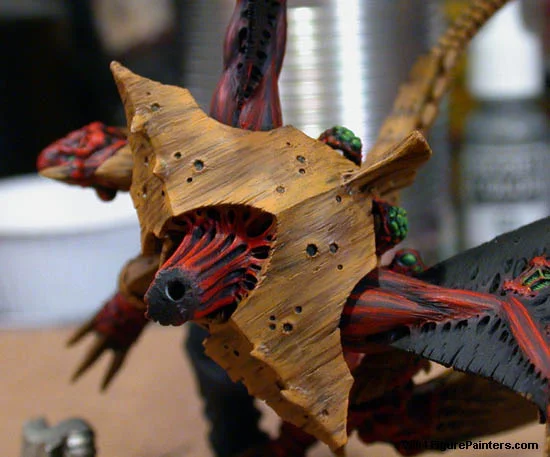
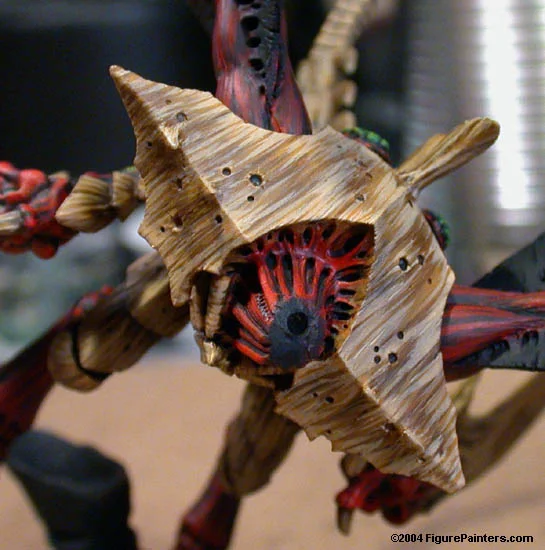
The head was mounted on a wood block and painted separately so that it would be out of the way.

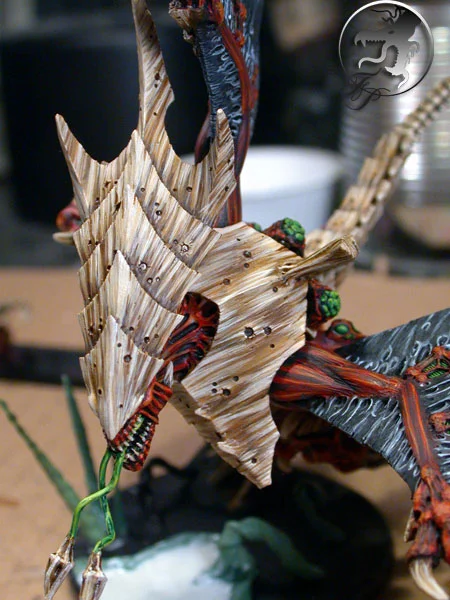
And here is the side view
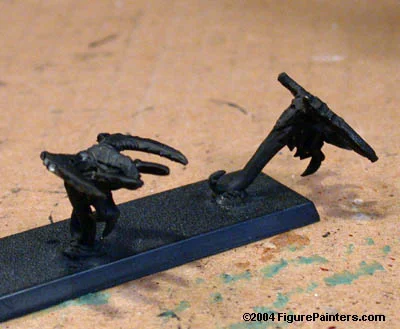
These are the rippers that will be accompanying him on the base. I cut the regular ripper head off and attached the head of the Epic 40k Trigon.
Next I started to work on the red of the "skin". The first color I used was GW scab red. This was thinned down using a Floating Medium by Plaid (it is a clear blending medium used to thin down paints, MUCH better than water. You can also use Future Floor Wax or any other desired suspension medium). As you can see in the picture below, it has gone on thin a blotchy. This is effect that am looking for to give the skin the underlying shade changes that will give me a good background for the later layers of color.
Skin Step 1


Here is a another picture of the first step, which illustrated the blotchy effect. Also when the thinned down paint (about the consistency of milk) is first applied it will look much brighter and more opaque, but it will darken as it drys. I would recommend doing a small area first until you get the hang of it.

Skin, Step 2
Next, I take scab red (Note: I always use a little of the floating medium mixed into the paint when painting. This will make sure that they don't give you the chalky look as you build up layers of paint. See the Carapace tutorial for a little more info.) and start painting on the "streaks" onto the skin. Also paint the edges of the skin and other protrusions that you will eventually want lighter than the darker base skin color.

Skin, Step 3
Next GW Red Gore is applied over the same streaks that had been made by Scab Red. I will also highlight the higher areas a little more at this point too.


Skin, Step 4
A 50/50 mix of Red Gore and GW Ruby Red (I don 't think they make this color any more. Blood red will work fine too. It just had to much yellow in it for my taste.) is applied over the streaks and other highlighted areas. Remember to make the streaks for the different colors smaller each time so that a little of the previous color will show through.


At this point I still have one more layer of highlighting to add the the skin. But I am going to wait on those until I have the armor and the all the little green bits done. This is to save me the hassle of having to touch up later where the green parts and armor get close to or merge with the skin.
Now it is time to paint all the little vents/sacks and other items that I will want to be green. First off I painted everything GW Snot Green. They were then washed with GW Ork Flesh wash (a dark green wash), they dry brushed Snot Green again once the wash had dried. Next I dry brushed a 50/50 mix of Snot Green and yellow over this concentrating it more to the middle of the vents. Lastly I added dry brushed a little yellow to finish it off. I used the same colors for the adrenal gland (little things on his back) and the tongue, but used pretty much the same techniques that I used to do the skin.


Armor
This will pretty much just be a reprint of my armor tutorial but now with pictures on each step.
Colors used:
A- Scorched Brown (Games Workshop)
B- Bestial Brown (GW)
C- Golden Brown (Delta Ceramcoat- the large paints you can get a Michael's Craft Stores)
D- Flesh (Coat d' arms paints)
E- Oyster White (Delta Ceramcoat)
F- White (Vallejo Paints)
-There is no reason I chose one manufacture of another, it is just what I had. I did use color "D" though because the GW Bleached Bone has too much yellow in it for me.
-Also for all of these steps I use Floating Medium by Plaid (it is a clear blending medium used to thin down paints, MUCH better than water). See the little caption at the top of the painting steps picture. Color 1 and 2 are the two colors that I am mixing. Color 3 is the blending medium that I am mixing in to the two paints that I mixed to keep them smooth. This way I can put multiple layers of paint on a miniature without getting that chalky paint build up look.
This is a quick reference for the different steps for the armor

Armor, Step 1
First I painted two thin coats of Bestial Brown (GW) to get a nice ever base color. Next, where the plates of the armor join put down small streaks of Scorched Brown that have been thinned down.


Armor, Step 2
Mix colors Bestial Brown and Golden Brown (50/50 -Same technique as seen in the mixing caption). Lay the paint down in triangular patterns as seen in Example 2 of the quick reference image above. the triangles may overlap. For the long straight parts on the wings and the scythes I just made streaks.


Armor, Step 3
Lay down a thinned Golden Brown in the same triangular pattern. Don't take this color up as far as you did in step 2. Also make the "triangles" thinner than in step 2 also so that a little of the previous color show too.

Armor, Step 4
Mix Golden Brown and Flesh (50/50 mix) and add the thinning medium (again the thinning medium is present in all steps. I usually thin it down to a soupy mix). This is then applied in the same way as the other colors but just with less coverage so that all the previous steps still show a little.

Armor, Steps 5,6,7,8
The picture below after step 8 when I had put the head on.
Armor Step 5: Now apply a thinned down Flesh in smaller triangles than Step 4.
Armor Step 6: Mix colors Flesh and Oyster White (50/50) and apply in smaller "Triangles" (or streaks where appropriate) that don't go up as far.
Step 7- Apply a thinned Oyster White in very small streaks than maybe only go 1/3 of the way up.
Step 8- Apply a very thin White just to the very edge of the armor.
Wings and Joints
The wings and joints were painted with about 4 different shades of gray working my way up from a dark Charcoal Gray to a lighter Ghost Gray on the very edges and lighter highlights.
Skin, Final Steps
The first thing I did here was a little bit of touch up a the places where the green and the gray for the joints had gotten onto the skin. Next I did the final highlighting with a mix of Golden Yellow and Red Gore (about 70/30 mix, or to taste)


The Base
Now it was time to finish the base. The spore chimney that it is leaping off of was made out of scultpy. The other items on the base were made out of green stuff. The white stuff on the base is magic sculpt. Magic sculpt is an epoxy 2 part putty that is water soluble. What that lets me do is wet my finger and smooth out the large surface on the base quite easily, it is also quite cheap and drys ROCK hard.

This next step involved:
1: painting the tyranidy terrain on the base and the bio pool that will later have clear casting resin pored into it.
2. Gluing the Rippers onto the base.
3. Gluing on the sand with white glue and painting it. Which usually involves a few washes to get some shades of color into the sand, and the a few layers of dry brushing for highlighting.
4. Next I added the long grass and the pinkish flowers to the base.
5. Now at this point I put of few coats of Testor's Spray Dull Coat on the model to protect it.
6. Lastly I pored the resin onto the base to form the pool. I let the resin cure a little in the cup first so that it would not be too runny when I pored it onto the base since there would be no "walls" to keep it contained. To get the green swirlies in the resin I dipped a tooth pick in some paint and then swirled it in the resin while it was in the cup. You don't want to mix it in to much otherwise you would just end up with green water.


Conclusion:
I was quite happy with the way that this model turned out. As always there are things on it that I would have liked to improve. But I was finishing it the night before Games Day. Maybe next year I will learn that starting a project 2 weeks before is just a bad idea. In total I probably spent about 40 hours working on it. But the best part about this figure is being able to terrorize my opponents with it on the battlefield.
I hope that this was informative and if you have any questions or comments feel free to ask.