
Making the Las Vegas Open Grymkin themed finals table
It is that time again! This year for Las Vegas Open I decided to go with a Grymkin themed table. I had other plans, but as always I ended up waiting to long to start and would not have had enough time. So hopefully you will see it next year.
Typically, I start with some of the smaller pieces on the table so I can get a feel for how it is going to end up. I will have a picture of what I want in my head, but getting it to that point can be challanging sometimes. I wanted a night sceen for this table, so lots of blues, pruples and desaturated highlights.
A little bit before I starting working on this table I got a 3d printer. I though it would be great fun using it to make cool stuff for the table! I wanted to have a cool pumking monster or burning whicker man on the table. I ended up going with a pumkin head monster. He fits right in with the Grymin theme nicely.
Here is my printer, a Creality CR-10S. I got it partially because it has a very large build volume for the price. It requires a little more TLC than some more expensive printers, but it's worth it for the build volume for terrain.


Here is the pumpkin monster printed and primed. It is approximately gargantuan sized! It will need some sanding and re-priming to get it to a nice smooth finish for painting. I am thinking about making another one to proxy as a Death Knell.

I bounce around quite a bit between different parts of this project, but for clarity in this tutorial I will try to keep the appropriate parts of it together.
I want the pumpkin monster to have smoke coming out of it's face. The easiest way to do that is to use a mini mist fogger. By putting it in a tupperware, connecting a fish tank air pump to it, and then having a tube outlet that runs to the pumkins' head.


And with the head lit and "smoking".

Time for some paint!
The head was based using an airbrush with (GC) Game Color Parasite Brown. I also painted the inside of the head after this picture.


Next was shading the cracks of the head with GC Beastly Brown.

Then highlighted with P3 Bogrin Brown. I have moved a lot of my newer P3 paints to dropper bottles with stainless steel balls in them. The paintes last longer, don't collect dried paint from the lid and the tops don't break!
And a final airbrush highlight with P3 Meaty Ochre. Keeping it more to just the top half of the head.

Mixing in a little P3 Menoth White Highlight with the Meart Ochre I add some highlights and texture to the pumpkin head with a brush. This is the same way I paint all the little pumpkins later on.

His body started out with a base coat of light burnt umber. With terrain boards I will use what ever random paints I have around and will usually try and use cheaper paints than what we use for typical miniatures. It gets expensive if you start painting terrain with fancy paint :) His body is going to end up green, but since he is plant based, brown is a good place to start as it will show though in the recesses.

The brown color was a little too vibrant for me to be a "night time" theme table. I had purchased a bunch or acylic paints at the hobby store for this project. I picked up some nice desaturated colors to us. So I thinned down Burnt Umber and took some of the warmth out of it.

With an airbrush I used Badger Miniature Air paint Swamp Ground to start highlighting. Making sure to leave some of the brown showing through in the cracks.

Using a mix of P3 Coal Black and a dark purple I shaded with a brush the recesses of it which is appropriate with the table being a night theme.

Time for some highlights! Using the same base of Swamp Ground and some P3 Cryx bane highlight to make a desaturated green I highlighted with a series of thick horizontal lines. This will help give the vines on it's body some texture.

Using mostly Cryx Bane Highlight, with just a little bit of green, it gets highlighted again. A final highlight with just Menoth White Highlight is applied sparingly.


I am just going to run the fog tube into the back of his head along with the light. Once it is all painted it will look just like another vine rope. It had a channel for the smoke to run through going in the middle of it's body, but it just was not working very well.


As an obstruction on the table I am going to have a house. I picked up one of the great Table Top World resin houses. Broke Egg Games sells them too. ;)
No farm house at night is complete without a smoking chimney and flickering lights in the windows. To that end, it is time to break out the drill and dremmel!
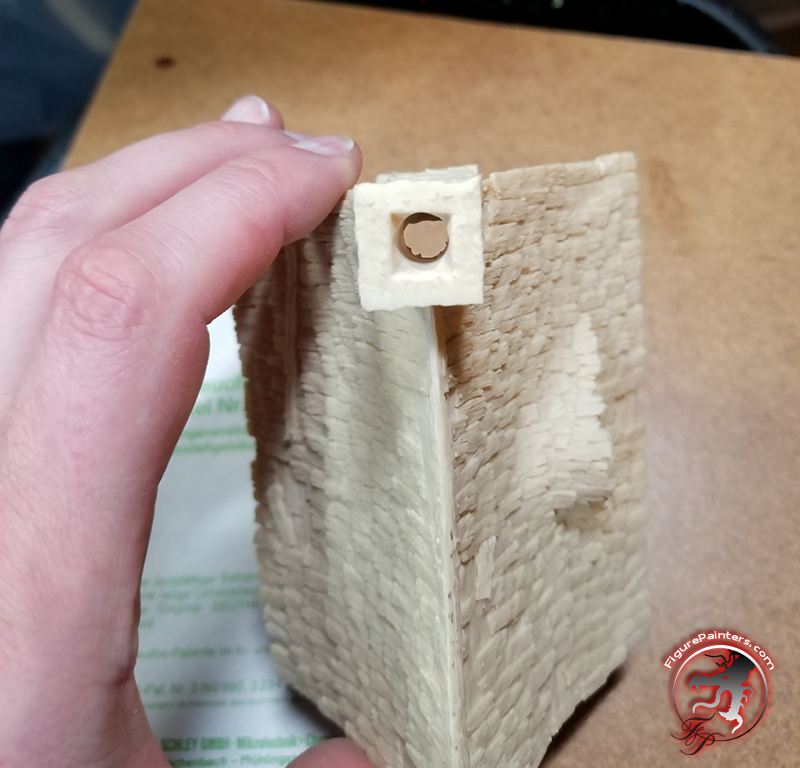
I am using a model train smoke stack for the house. It runs on 12-18v. So I will need a stack of batteries in the house between the lights (that run on 3v) and the smoke maker.
To test it I just plugged it into a 12v power supply. The smoker needs a few drops of oil to make the smoke.


It makes cool little smoke rings too!
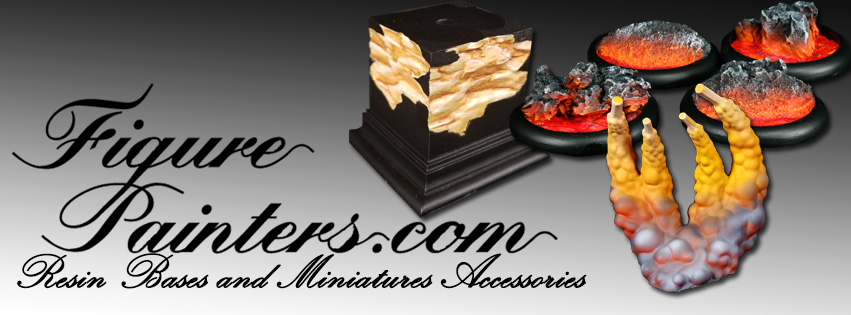
The windows were solid resin, so they need to be drilled out too. Then using an exacto blade and file, square out the holes in the windows.

With all the stuff inside the top is going to need to come off. Using a few 1/8" dia rare earth magnets it will be strong enough not to be casually knocked off.

Time for some paint! After it had been primed grey I painted the wood a desaturated brown. Everything then gets washed with a watered down mix of purple, grey, and armor wash. I am going to coat everything to bring the house inline with a desaturated night theme and the general purple tint of the table.


Here it is with everything washed with the purple mix.

To highlight the stone I used P3 Cryx bane Highlight for the first highlight, then mixed in some P3 Underbelly Blue for the final highlight. I am keeping the highlights to an upper direction on the stone, kind of what moonlight would give you. Also the choice of highlighting colors will keep everything cool and desaturated.
The wood is highlighted by mixing Cryx Bane Highlight into the base brown color, then a tiny bit of underbelly blue too.


I want something with a little "pop" for the roof tiles to make it intersecting. Starting with P3 Coal Black the shingles get a base coat.

To highlight the shingles I start mixing in Cryx Bane Base to the Coal Black and apply streaks highlighting the lower parts of each shingle. The second step is adding some P3 Underbelly Blue to the mix and add another streaked highlight lower on the shingle. Then using just Underbelly Blue I pick out a few edge highlight details. (this picture is from a little later on though)

The window panes were made using some squares of plastic and fogging them with some spray can dull coat. You can use cut up blister packs for this. Krylon also makes a fogging spray that would probably work well too. I used white glue to attached it to the inside. If you use supper glue it will fog the plastic. This would be a cool effect if you had a snow scene going, but that was not what I wanted on this house.

To add the lights I purchased some 3v candle flicker LEDs off ebay. A little soldering later we have lights in the windows! Running off two AA batteries this will last all weekend at a Con. They were stuck into the house using hotmelt glue.


It gives a nice warm inviting glow to contrast the horrors that will be happening around it on the table...


I can't have the smoking chimney running all weekend. It uses its' juice too fast for that. So I have rigged up a timer for it. Using a mini time delay relay timer that is programmable, I have the chimney run for 1.5 minutes then turn off for 15 minutes. It will keep running this cycle as long as it has power. The LED in the picture is there so I can check that the programming was running correctly.


The themed objectives are going to be glowing wells. I am not sure what kind of wishes they will grant though...
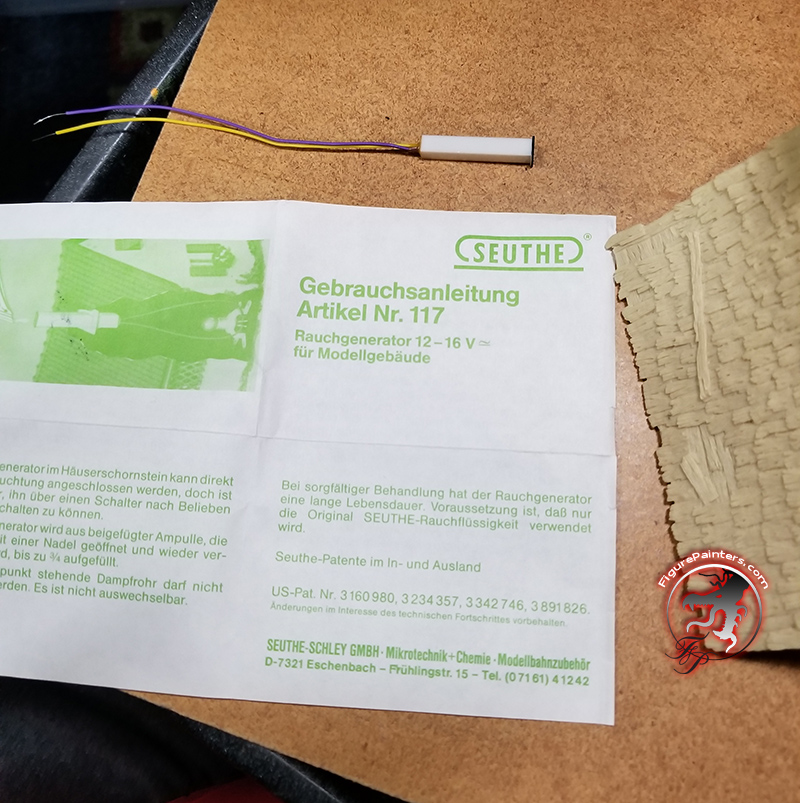
Using some hollow bases I have made to hold battery harness I wired up 3v pink micro LEDs and solder them to the battery mount.


The wells were painted the same way as the house. I used thick tacky glue and super glue to attach them to the base. The thick white craft glue to to seal the inside of the well so I could pour in clear resin after (though I did not end up doing that).

I used some hot melt glue to tack down the wires under the base.

Here are the finished wells with the lights and painted pumpkin scatter terrain. The pumpkins will be the toppers for the flat terrain rubble areas.


Now the time consuming part. Trees! Oh the trees...a forest full of them....><
I am using galvanized electrical fence wire for the tree armatures. It is tough to work with because it is very stiff when bundled together, but it will give me strong trees. It only cost $30 for a half mile of it. If you want something a little easier to use, aluminum wire work well. Salvage yards quite offten will have a bunch of it pretty cheap.
Using my arms as a measure I cut batches of 10-12 wires and straighten them out. Sticking one end in a vice and the other end in a drill I am going to twist them together. Eventually I would have me with a pair a pliers and my wife run the drill. The wires like to pop out of the vice, and using plyers ended up being easier.
Make sure to wear gloves. The sharp ends of the wire will do a good job slicing up your hands.
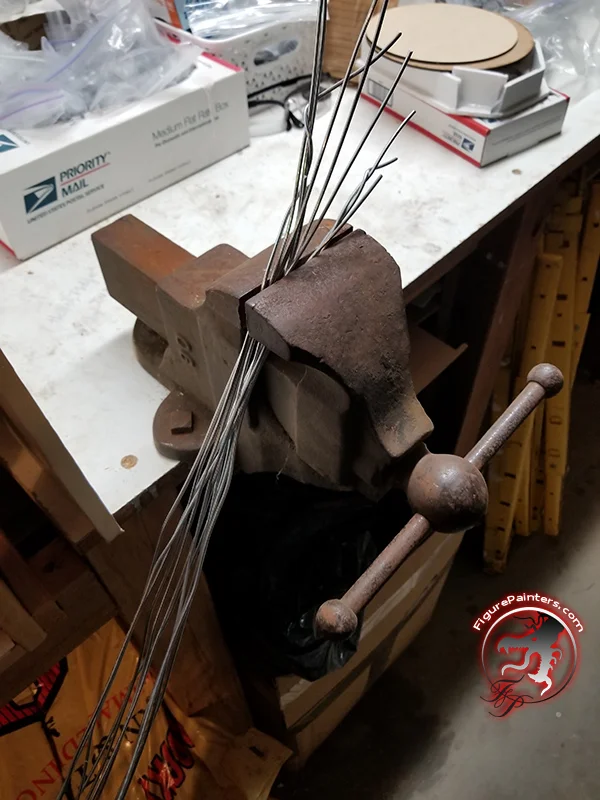


Hold on tight and don't go too fast!

Using bolt cutters (about the only thing that will cut though the bundle of wrapped wire) I cut it down into sections to make trees out of.
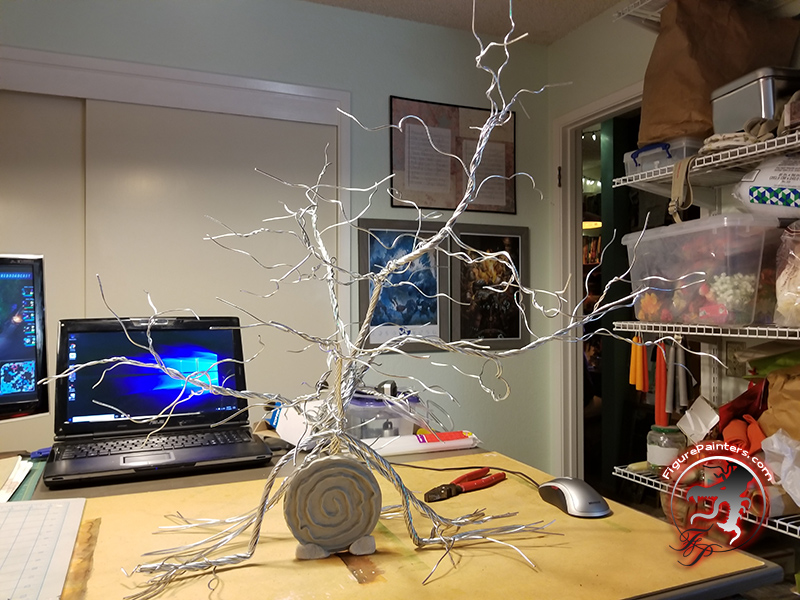
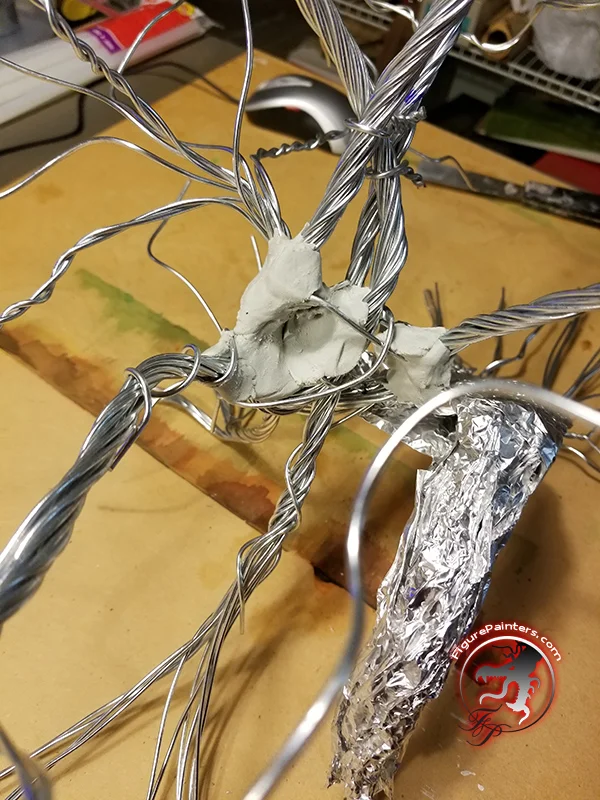
Using pliers and needle nose pliers I unwind some of the wire and bend it around to make some scragagly looking tree shapes.


The final skin of the trees will be made with sculpey, so to bulk out the trees I will be using aluminum foil as sculpty gets baked in the oven to harden.

Ripping up strips of foil I wrap them them around the tree armatures. Making sure to squish it on nice and tight so when I skin it with sculpey they don't get soft.


Using 50% off cupons at Michael's I slowly built up 4 boxes of Sculpey. I used 3.5 of them over this project.

Once you warm up the sculpey in you hands it gets quite soft. I wear latex gloves for working with stuff. It slowly builds up on your hands and does not clean off easily.
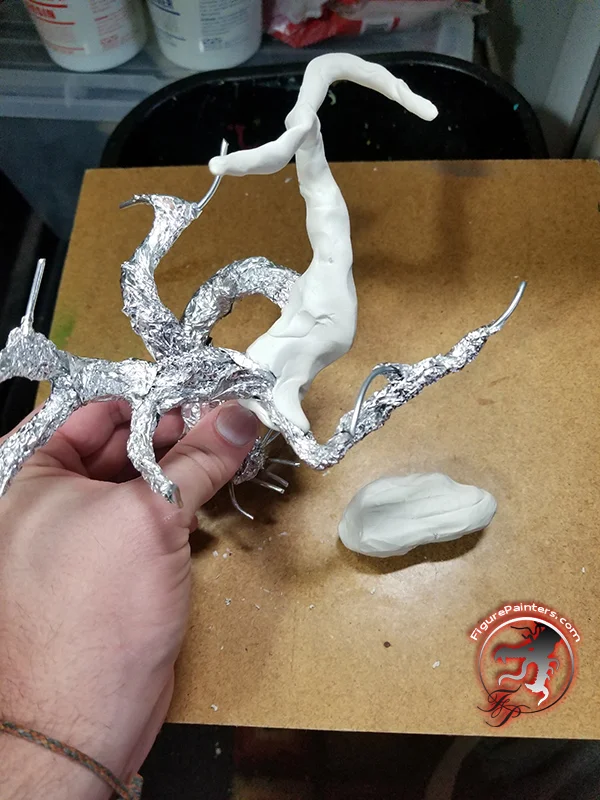
Also, holding the base of the trees without a glove scratched up my hand pretty good.

Using varrious sculpting tools, rollers, and texture tools I make some bark like textur and shapes. There will be a lot of trees, so I am keeping the tree textures pretty simple as I don't have all year to make them. At this point I have three weeks till LVO... and most of the tutorial you have read so far actually happens after this part.


More trees and more trees... I am making a ton of them a will figure out how to fit them all on the table later.


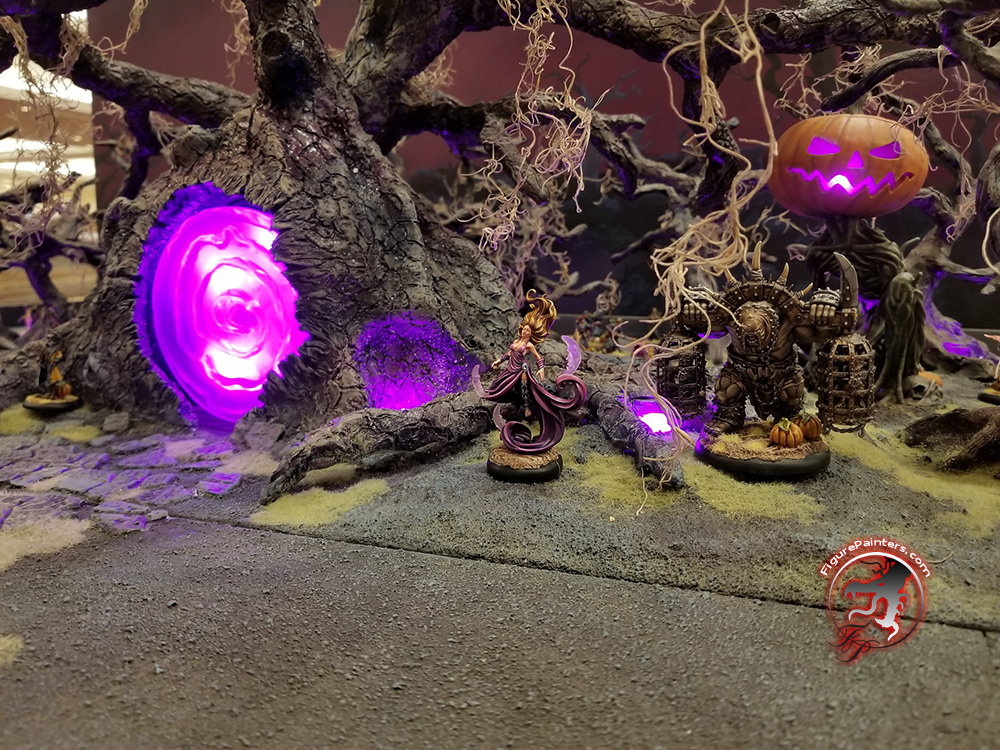
I really like the portal idea they had on the L&L table last year, so I wanted to do something similar. Though I wanted mine to be lit and rotating.
I am going to make my portal built up on a CD. First I covered it with epoxy putty, then sanded it flat. This was to thicken it up for casting later. Once the first layer was clear I went back with more epoxy putty and built up a swirl.


Since we are at the portal, I'll just go ahead a little and show the rotating assembly for it. Here it is cast clear resin tinted with purple ink and a little bit of pink glow powder.

I will be using a slow rmp (5 rpm) motor that runs off 12v. Using 3v, 9v, & 12v for the different lights and motors make it super easy to use those small transformers that come with say your wireless router, and they are pretty cheap to purchase separeately.
I made a simple mount for the motor with a scrap of 2x4 and a hole saw.

Using another CD I mark the center of the portal for where I will attached the clear acrylic rod. The stand-off rod will give me some space for lights and to keep the motor mount from showing through the portal.


Unfortunately in my haste to do this the post is not perfect and the portal wobbles a little when it rotates.


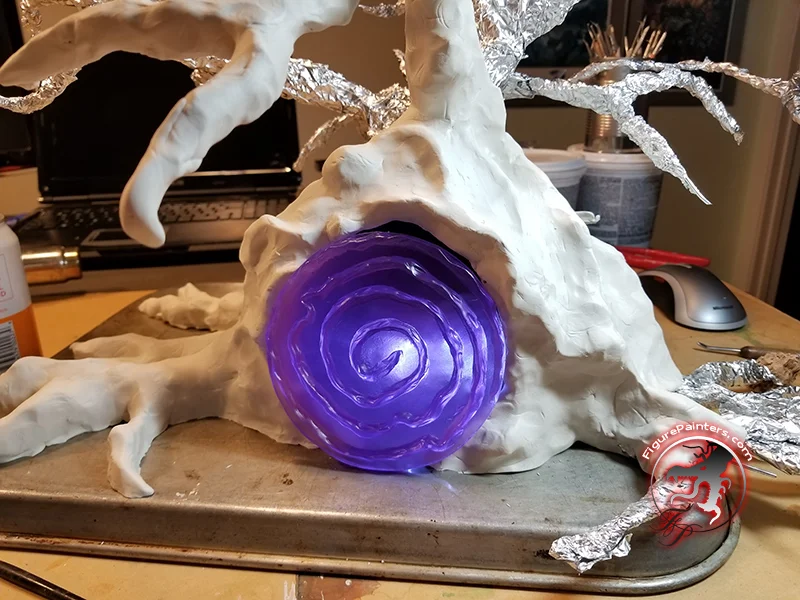
Now back to the BIG tree. Typicaly I try to have a large focal point on the table, which this tree is going to be. I did not have an exact plan for the tree except it was going to be big. Here is the start of the tree, a lonely portal... I am using the master while the clear cast is curing. The clear casting takes quite a few days before it is not sticky anymore.

Here is the start of the tree arch opening that goes around the portal. If I had more time I would have built a housing that the portal fit up to and all the lights and motor would fit in, then build the tree around that.

After some time, twisting, and bleeding the tree starts taking shape.

And with the portal. I spend a lot of time bending branches around, standing back, and rebending to get something that looks decent.

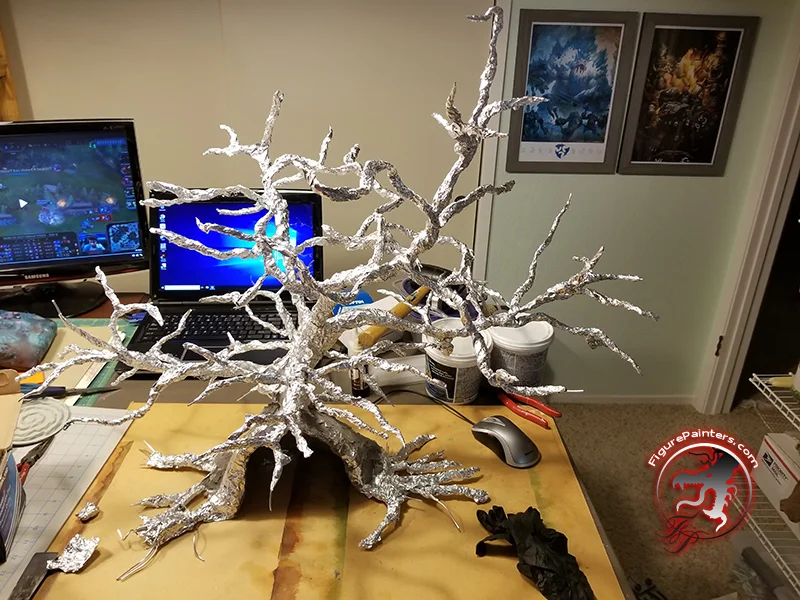
Time to start wrapping and building out the tree with foil.

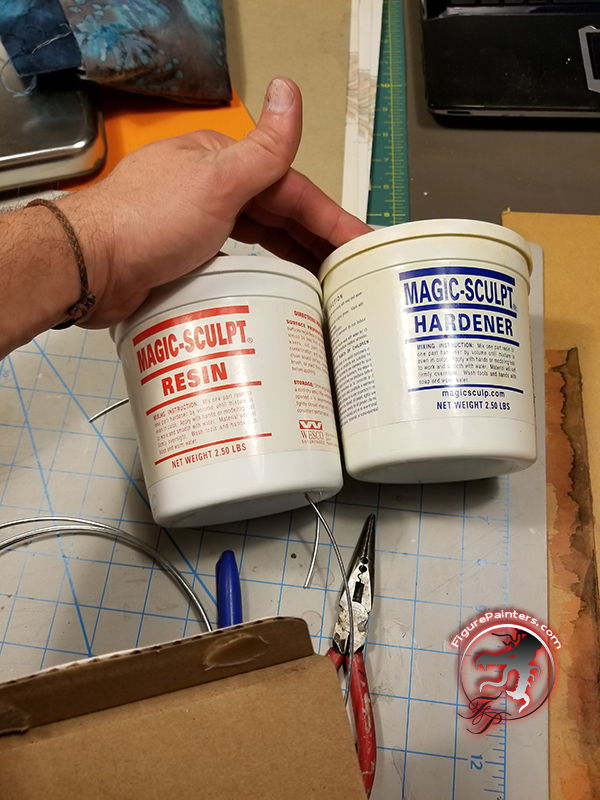
There were some gaps between the larger branches that I want to fill with putty to stiffen the tree up. Using magic sculpt works well for this as it gets pretty hard and is cheap.
And all wrapped up with foil. I am going to be using a lot of Sculpey on this...


Checking the portal.

Time to start in with the Sculpey and make it look more like a tree. I will be using a heat gun to "cook" the sculpey as the tree will not fit in my oven like the little ones. Optimally I would have had time to take it to a pottery place and have them cook it for me. It only takes 20 minutes or so at 275F.

We experimented with a few bark textures.


The second pattern is the direction we ended up going. So first we pressed in a random texture using cork chunks.

Then went through with a harder sculpting tool to add the bark pattern. This is going to take a long time....

We slowly worked our way up adding sculpey, adding little details, and doing the bark texture. Once the lower half was finished I cooked it with the heat gun so if we bumped it we would not mess up what we had already done.


At this point all the texturing is done. So off to the garage, 2 heat guns and 5 hours later the sculpey is all cooked.


Now it's time for some paint! I am going to use spray paint on this as it is pretty easy to work with. Though using a brush and latex paint would not be bad for the base coat, it would just take longer.
First the tress (and all the little trees) are base coated a dark brown. Next they get a sparatic purple/red and blue shading.


Now I can actually start turning this into something that looks like a gaming table! The table will have 3 sections. The middle section which will be the play area and two side boards that are decorative. This makes it easier to transport the table around to different events and to store.

Setting the portal with it's mount. The tree gets lifted and set over it.

While that is drying it is time to drybrush some highlights onto the trees. I mixed up some brown and grey together for a good night time highlight. Then add a little more grey for a final highlight.


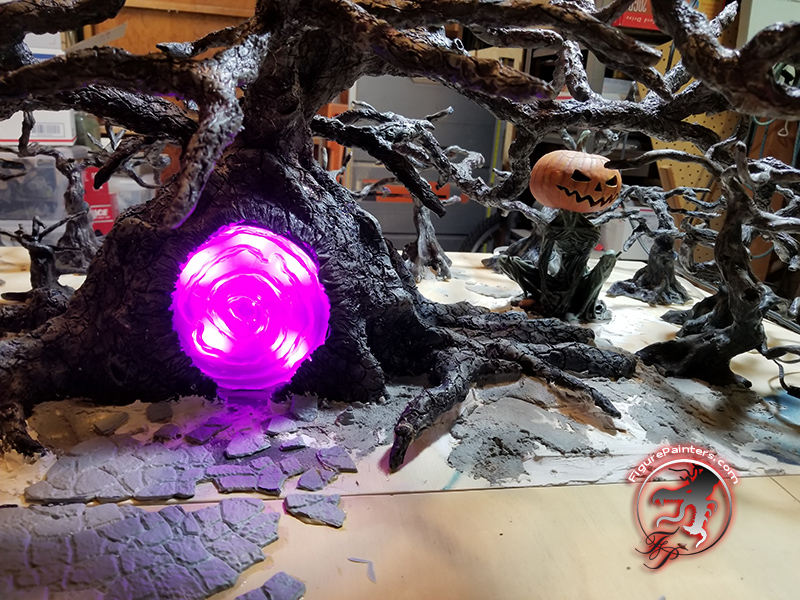
The pumpkin monster's new home under the tree.

To attached the trees I am using construction adhesive. This stuff is super tough once it cures and is nice and thick to fill all the gaps. Before I started gluing down the trees, I placed them around the table, and push them around until I liked how everything worked. I did not get a picture of them all laid out.


To go with the night theme I wanted to have a back drop for the table. Using the same purple and blue spray paint I shaded a board that is going to be the back drop.


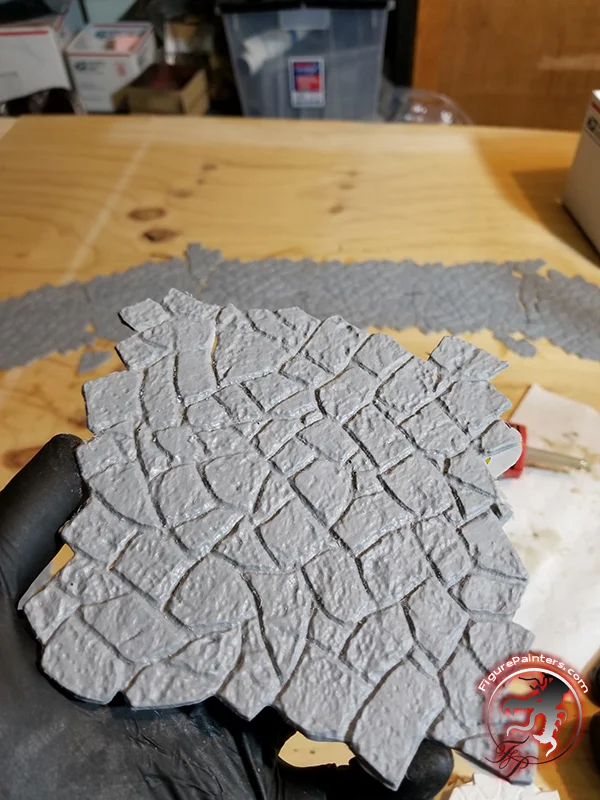
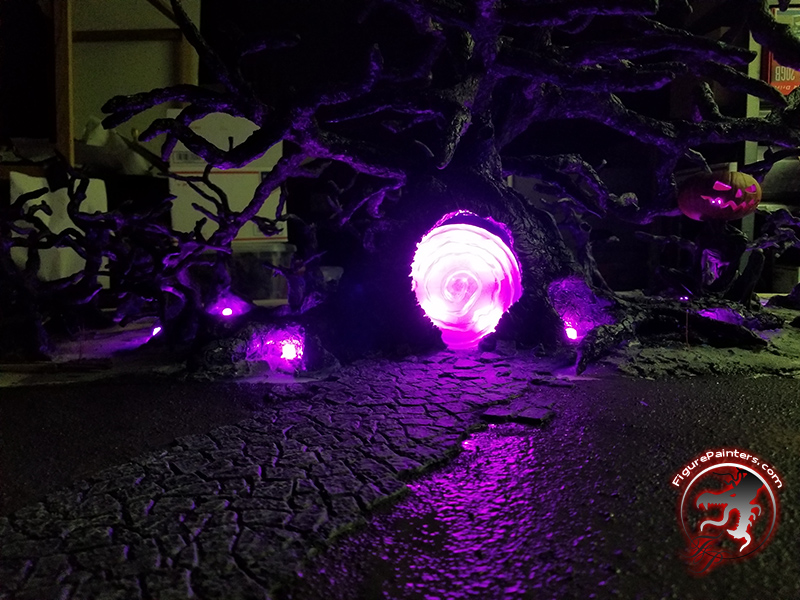
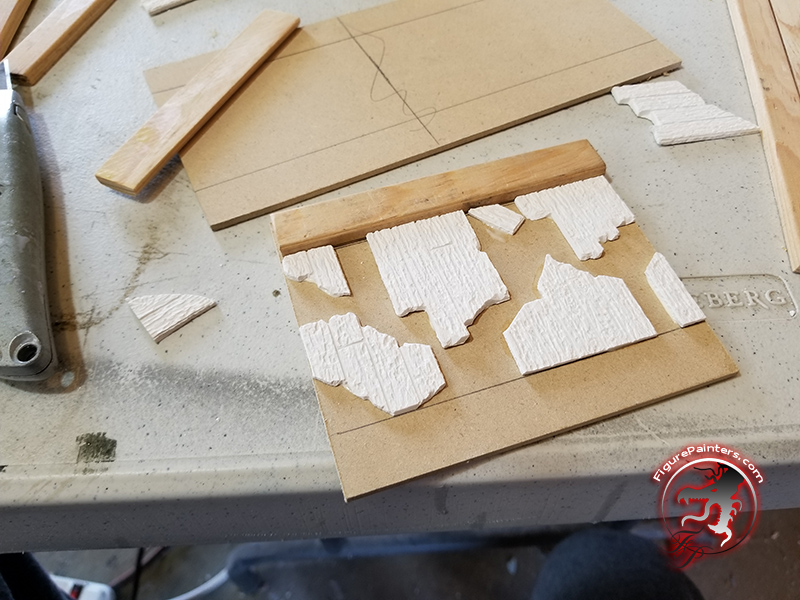
I wanted to have a road going through the middle of the table. Maybe something like you would find outside a city and the big tree popping up in the middle of the road to start disgorging horrors. I had found a broken stone pattern for cake decoration at the hobby store which I used to make resin road sections. I did not use plaster on this table as the thinner plaster road parts would break and chip pretty easily. I started with a straight road, but it looked very plain. I added a wiggle in it and it looked much better. Also the road is the help break up the main board some. If it was just textured sand it would be very borring. It helps tie the side boards into the center section too.


Using a metal spackle knife to spread it around.


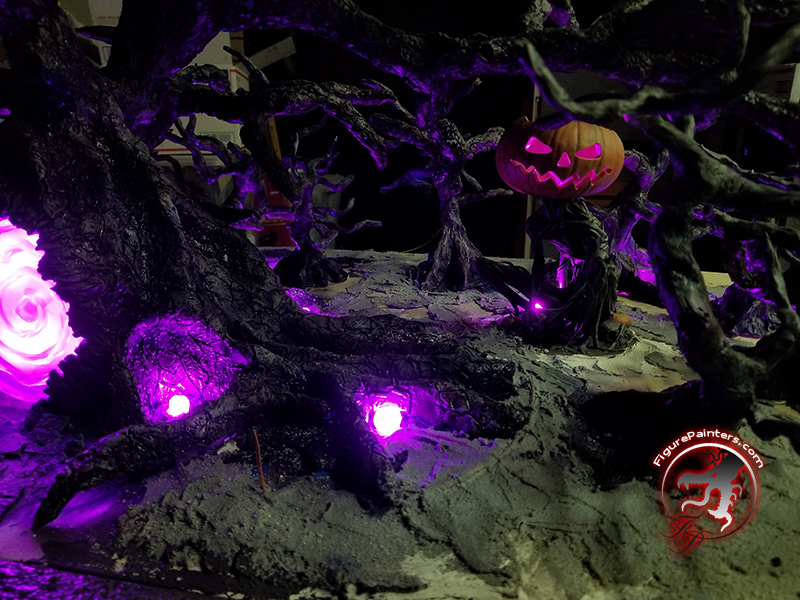
Interspersed around the side board will be glowing fungus stuff. Using 12v pre wired LEDs I drilled out the bottom of the fungi and using hot melt glue stuck in the lights.

Using the hot melt glue again I stuck fungi around the side board. Mostly near trees. They will add a spooky glow to the forrest. I will group up the wires, tape them down and putty over them. The wires are very thin, so the patch compound should cover them well.


I also placed some wire pairs in the side board so I can wire in my Grymkin models and they can light up all weekend too.

I use ready-mix concrete patch to cover them. It is tough stuff, wont crack and has a little bit a texture too.

Getting in between all the tree with the branches in the way is quite the pain.

Before adding the sand texture to the table I'll get the road painted. First some primer, then a grey latex paint base coat. I will use flat latex house paint quite a bit on my tables. It is relatively cheap. Can be tinted what ever color you want, and is quite tough compared to acrylic paint.

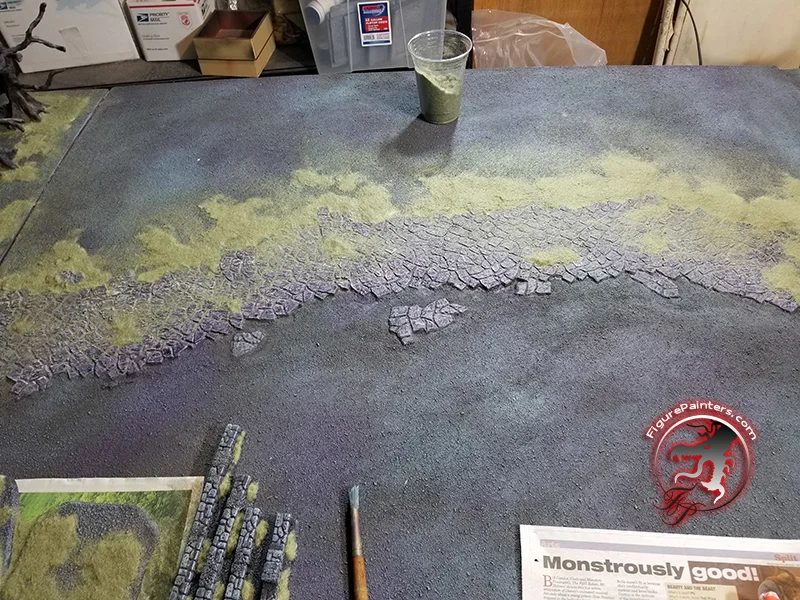
The road then gets a dark purple/black wash. Then highlighted back up with some grey. Also in the following picture I have put down the first layer of sand. Typically I will put down a thick layer of latex house paint then cover it with play yard sand. You can get 40lb bags of sand for less than $5 at the hardware store. It will be clean and a consistent size. Once that has dried a while, brush the excess off and cover it with another thick layer of latex house paint. I mixed some brown into my grey house paint to get a desaturated grey/brown ground color. Put it on thick, this will seal in the sand, and it is also going to be your final play surface. You want it to be tough.


Once the base coat of the sand was all dry I gave it a splotchy wash with purple and then green to make it a little more interesting.


First highlight on the table is the base grey/brown with just a tad of light blue mixed in to lighten it up. Then a finial patchy highlight with a little more of the light blue mixed in. This will help break up the flatness of the table.


Meanwhile Courtney, my wife, was working on the back drop. It is a little hard to see with the reflected light in these pictures. She did a great job, and this project never would have been finished without her help!

Next up is adding some grass to the table. I am using a lighter green static grass to stick with the night time theme. Using white glue to stick it to the table. Just squirt some out and spread it around with an old art brush (or fingers).

I worked in sections so the glue would not dry at all.


Using some hanging moss I got at the craft store we decorated the trees.


At this point I cut some foam supports under the longer branches and slid it into the back of the truck. Early that next morning we left for LVO! Cutting it close as always....

But there is still more to show. Before everything was packed I was working on some of the other terrain for the table. I wanted 3d trenches for the table, but to not have the problem of models tipping over and trying to bridge the edge. To that endever I made the walls of the trenches movable. The water will be a deep purple/blue color and the Forrest/rubble templates will be sanded mdf templates.


A little black primer on everything. Or a lot in the case of the plaster parts.

The shallow water. I painted it with spraypaint, then once that had dried a nice gloss coat to keep it shiny.

Painted the trenches grey and brown then applied a dark purple/black wash on them similar to the house.

They trenches were then highlighted back up with grey, then with some light blue mixed in for the final highlight. You can also see one of the fog bank clouds here in this picture too.


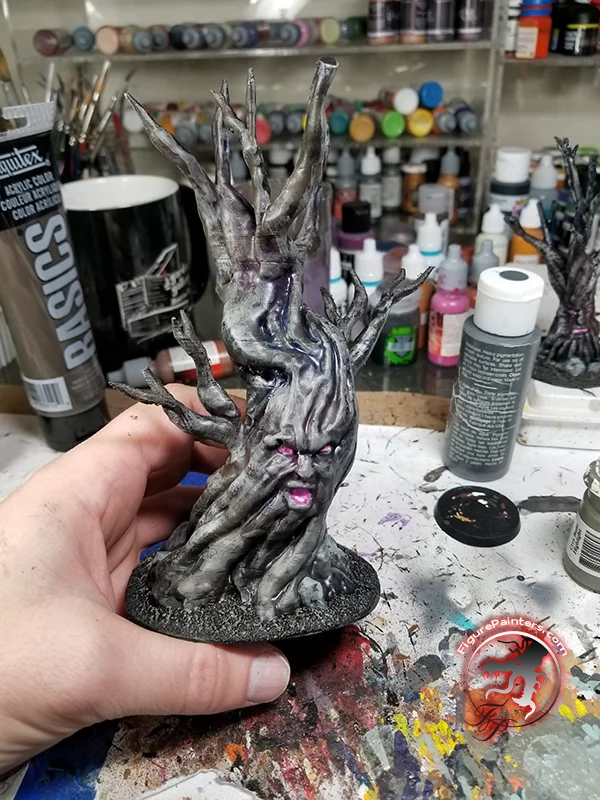
One of the movable trees that go on the center of the table. Some of them have spooky faces too!

I also made some corn rows for the rubble templates.


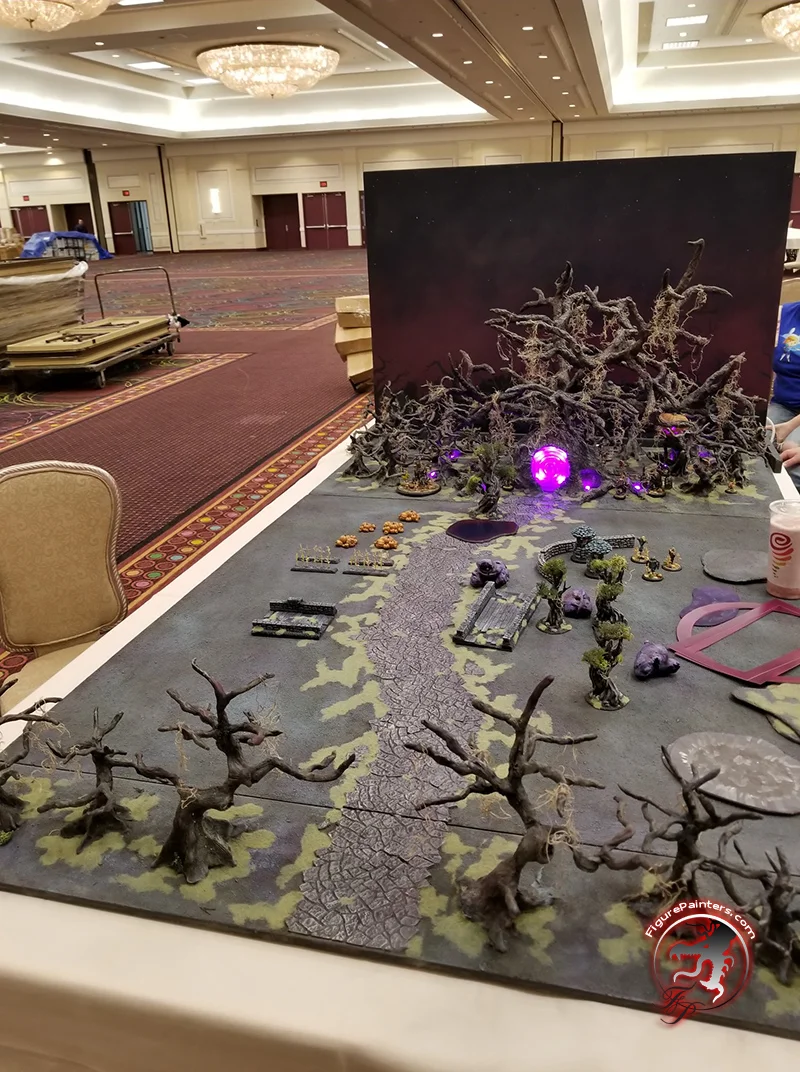
Here are a few pictures for the event. I still have a lot to do on the tables. I need to add all the foliage to the trees, crows, bushes, and fabric cover that will have stars hanging from it too!
The zones were cut out of plasticard then painted so their color would fit in with the table.


I should have the rest of the pictures up soon. Hopefully you found this tutorial helpful and informative. If you were able to make it to LVO thankyou for showing your support! I look forward to seeing everyone that can make it next year!