
Making the Las Vegas Open 2017 Cephalyx Finals table.
Each year I try to make a finals table for the Las Vegas Open Warmachine events I run. This year I went for a Cephalyx underground bio factory.
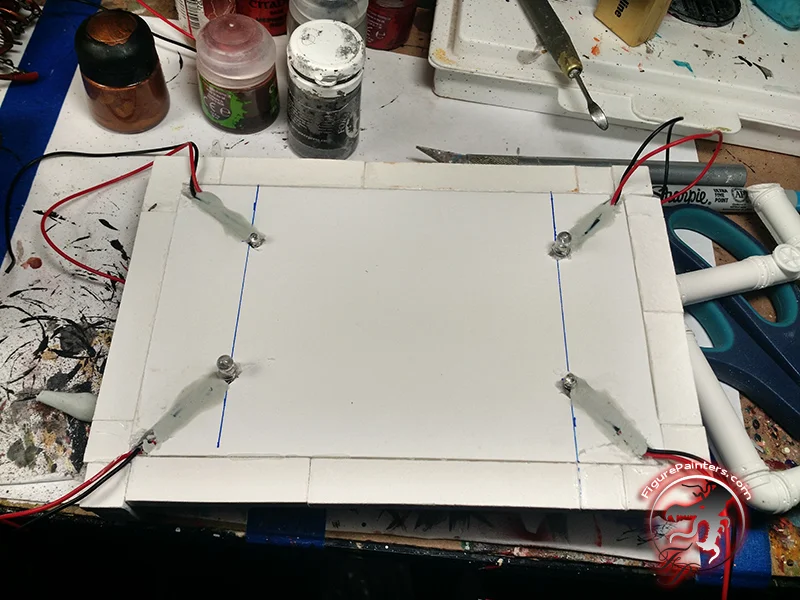
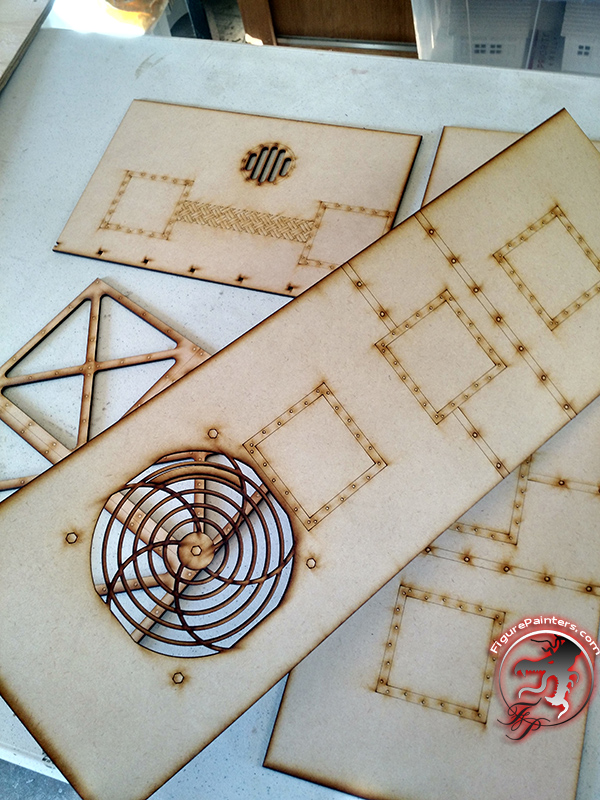
First up is the general layout that will be laser cut out. The smaller red square are etch patterns that will be getting drudge bio pods on them.

Here are some of the side board panels along with some misc parts.

And all the parts laid out to be laser cut.

While things are getting cut I am working on the other terrain bits that will accompany the table. First up is the Cephalyx colossal along with its' bio chamber.
I am making the colossal by kit bashing a Skaven monstrosity with some Cephalyx monstrosity bits.

Here it is all together with sculpting the even out the muscles and cover the skaven runes and such.


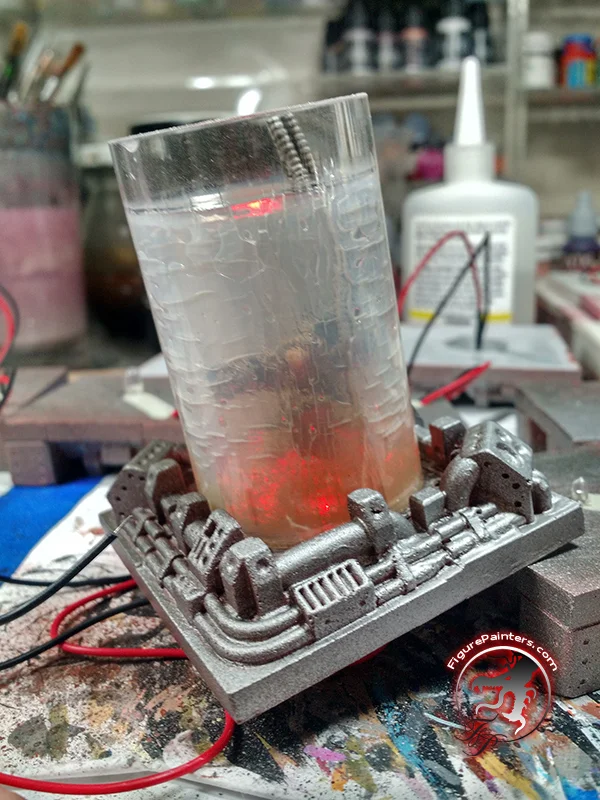
Now up is his bio tank.
1. Cutting plexi panels and gluing them together to form the walls of this bio chamber.

2. Walls glued together

3. The base of the chamber. Made of foam core with diamond plate plasticard glued on top.

4. Adding some pipes and vents to bottom of the bio chamber.

5. The bottom surround of the bio chamber assembled.

6. The top lid of the bio chamber assembled. I plan on having lights in the bottom and top of the chamber, but those will not go in till it is pretty much finished.

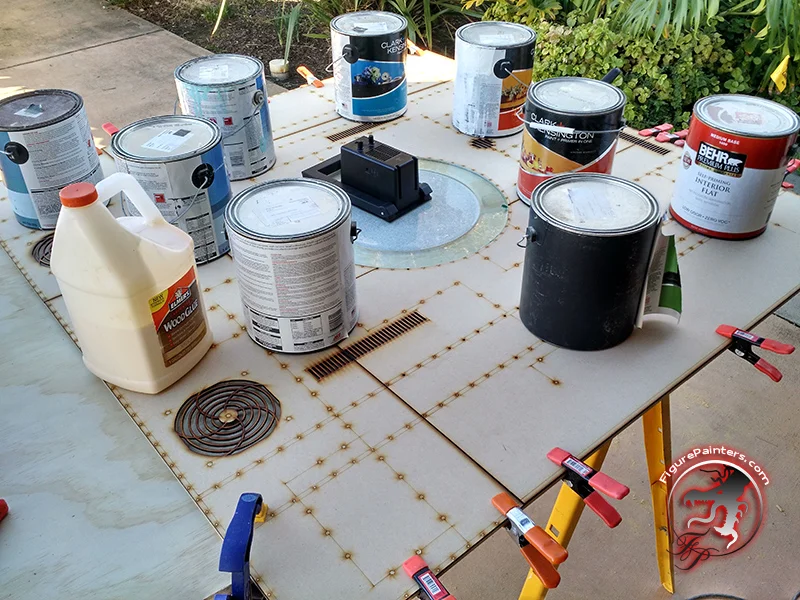
7. Painting the board I want to go for a rusty dark metal look. To achieve that I am priming everything a rust red.


8. After that was dry I spray painted it a dark bronze color and then hit it in spots with an aluminum color spray. Once the table is mostly complete I am going to go back and add control panel glows, oil and blood stains.


9. I am going to seal the gap between the plexi panels and the base with thick craft glue. It is quite a bit easier to deal with than caulking for this application.


10. And with the exterior rim glued to it.

While this is drying it is time to paint the colossal! This is going to be a somewhat quick paint job as he is going to be in a somewhat clouded tank and does not need to be super fancy.
1. Primed and ready to start painting.

2. Base coat of dark flesh airbrushed on, then a top highlight coat with the airbrush of a medium flesh.

3. Mixing in some bone white another airbrush highlight layer is applied.

4. After that I went back with the dark flesh and shaded the cracks/under areas. Then taking the bone white I put some hard highlights on it. This will help it "pop" in the bio tank.

5. Using a a clear red color, airbrush all the stitching to make it look a little inflamed and anywhere else I wanted it a little red. Adding in a little purple in spots would look good too, though I did not do that.

6. Fast forwarding a bit all the metal and wood is painted. The metal was painted silver, then heavily washed with GW nulin oil, then flesh wash. That is a pretty easy way to add some shading and weathering without spending a lot of time. Use a blow dryer to help keep the washes from pooling.


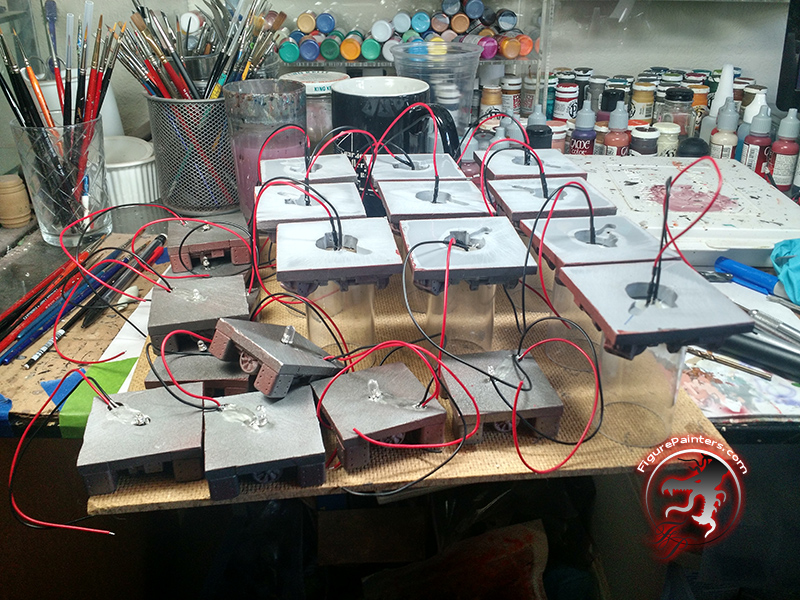
While things are drying with the colossal bio chamber I started working on the individual drudge bio pods.
1. Making the master parts for the drudge bio pod bases and tops.


2. Using silicon rubber mold material I make a master mold so I can make a bunch of bio chambers.


3. I am going to need a bunch more drudges, so making a mold of a few too with an umbilical cord.

4. Painting up some more drudges for the bio pods along with Cyphon

5. Test fitting a drudge in one of the pod chambers.

6. I air brushed some color to look like gunk build up in the bio tube, then glued it onto the base for the bio pod chamber


Here is one of the drudges that will be going into the bio pods.

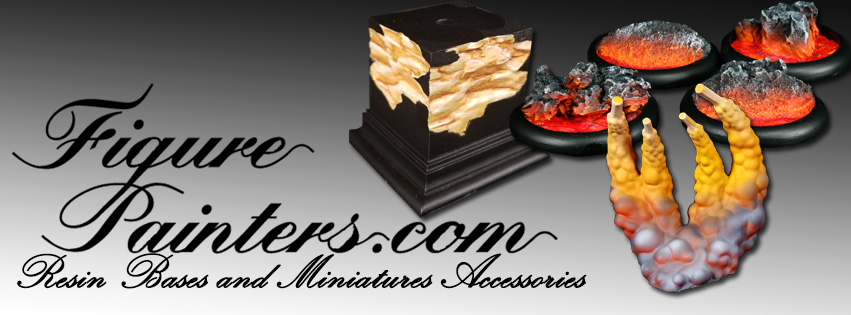
To run the wires up to the top of the bio chamber I have hollow plastic tube.
I painted then cut the tubing. Then fit it to the camber and figure out where to make the channel for the wire.

LED hot glued into the bottom of the bio pod. I have solid red LEDs and candle flicker LEDs to use on the pods/table.

The top of the bio pod with the LED glued in and wire through the post.

Testing out the LED with the mini inside.

I am using some old clear resin I have for the Bio pods. It is supposed to be clear, but it is a little old.....
It will be perfect for dirty bio pods, and if it does not dry all the way it does not matter as it will be all contained and no one will be touching it.


This stuff you can not degas and when you mix it get super bubbly. But they will mostly come out by the time it sets up.

And testing turning on the light.

Once the resin is all set up (the next day), it is time glue on the top.
I just used white glue to attach it. It should be strong enough and it is easy to work with vs super glue for this.

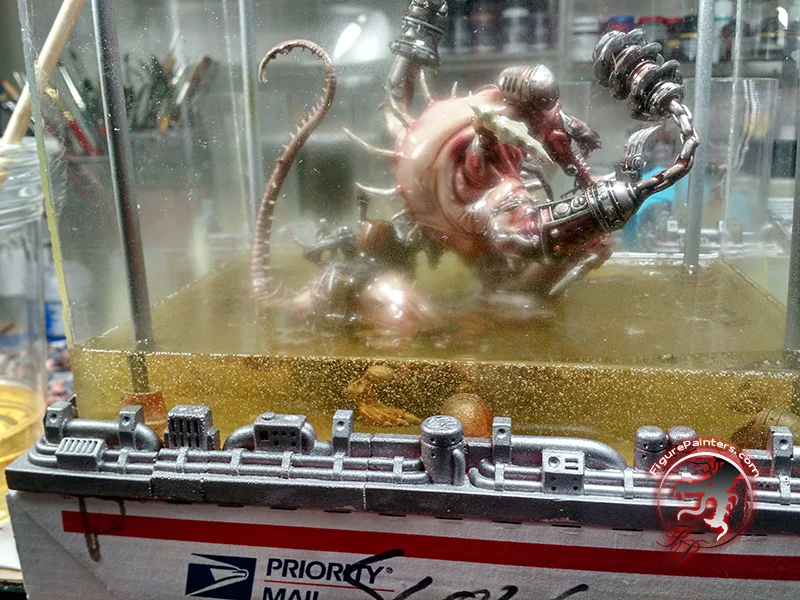
And lit up. IRL you can see the drudge in there much better. The camera has a hard time taking a picture of it. You can see the resin cleared up quite a bit too.

And a video of what the flicker LED looks like.
The pile of tubes for the rest of the bio pods

Working on the rest of the Bio pods I have where I need to drill my holes and cut channels.


Working on the LEDs on the larger colossal bio tank.
This is the lid. I am cutting into the foam core lid to embed the LEDs. The wire will run inside of tubes inside the tank to get to the bottom.

Covered with putty.
Then I taped off the LEDs and painted the underside.

Cutting the bottom of the bio tank to make room for the wires.

LEDs glued in along with the posts for the wires from the lid.


Added a little smudging to the walls with the airbrush.

Colossal glued in.

I added just a little bid of "clear" resin to start. This way if there are any small holes they will get plugged before I will it up more. As it was starting to cure and get thick I dribbled some over the mini to there will be drips and runnels of water running down it.
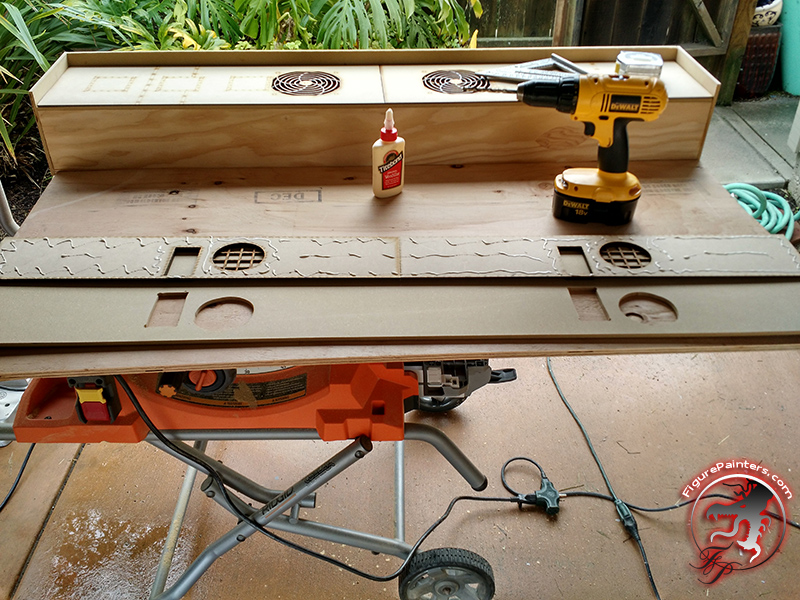
I have been getting parts cut this week, and today I was able to get some time working on the table itself.
First are pics of stuff I was working on during the week.
Making all the bio tanks I cut up a long piece of tube.

All the tubes shaded some with an airbrush. This will make them look a little older and grimier.

One of the drudges glued in and his back cable attached to him. The tooth pick is to help hold the cables as the glue dries.

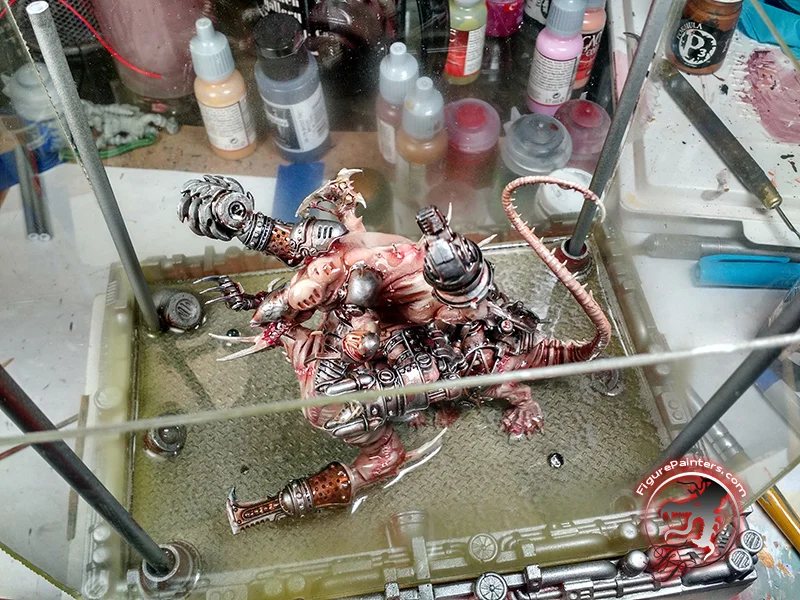
Big batch of that old resin mixed up to put into the large bio chamber and some of the bio pods.

Resin poured into the larger bio chamber. Most of all those bubbles will settle out of the resin by the times it cures. Though there is going to be a problem.....
But before that here is a sneak peak at Cyphon. He is going to be suspended up above the side board overseeing operations. The colors are a quite washed out. Reds, bright light and my phone don't mix too well.

This pictures is a little better.

Now back to the non-perfection that is the bio chamber. The first casting ended up tilted a little as the surface I had it on was not level....
You can also see how the resin pulled in at the corner.
I also poured some partially cured resin over the gargantuan. This added a nice sheen to him and some drips so he looks like he is splashing around in his tank some.


So trying to fix it I added some more resin to level it out. But this resin (which was a different type) cured differently and pulled away from the plastic. So it looks like crap.

To make the waves I am using Woodland Scenics Water effects. It is a thick gel that you can sculpt into waves and shapes. It is the same stuff I used on my Guild Ball fishermen bases.
I squeezed a bunch in there planning on spreading it around.

Using a sculpting tool I pushed it around into something that will look like waves when it drys. It will take a few days for the water effects to dry.

Now back to the board itself.
Here are some of the parts as they are getting laser cut.

And some of the pile o parts that are left over. I should be able to find something to do with these either with this project or another in the future.


Back at home with the parts starting to lay everything out finally!

Some more of the cut table parts.
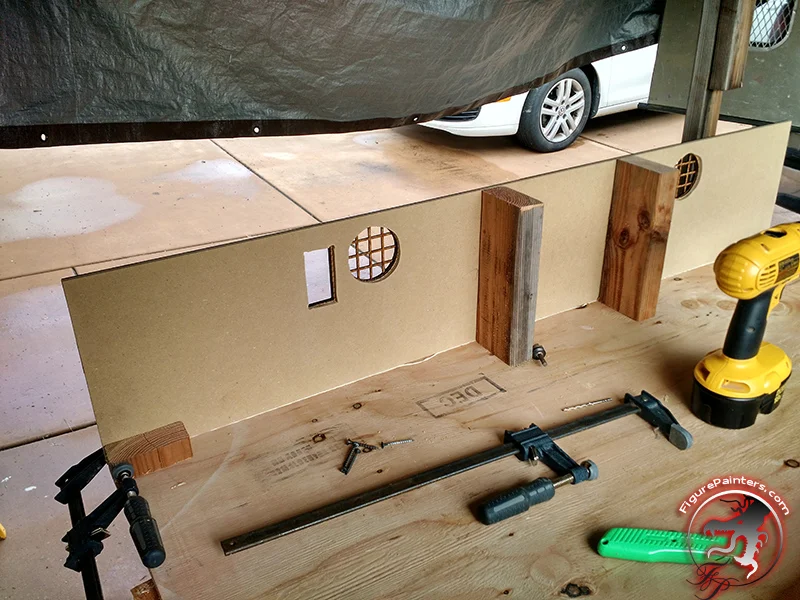
Some of the side board vertical parts.

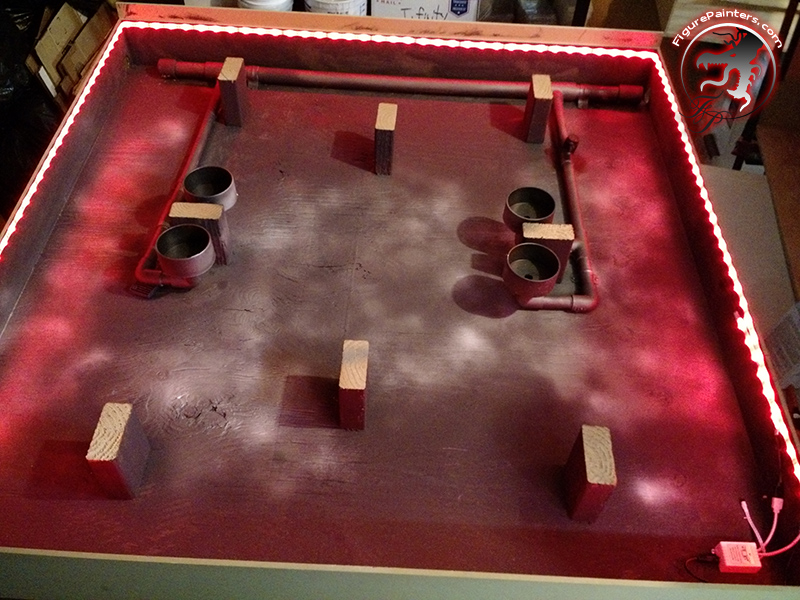
Here is what the basics of the main play surface will look like. Everything when done will be flat and smooth for easy play. All the terrain will be movable.

Under this 1/8" thick top layer I will have a 1/4" mdf layer. This will stiffen it up quite a bit and help keep it from flexing as people lean on it when playing.

With the table laid out I drew the areas I need to cut out onto the 1/4" mdf. You would actually see any of this sub mdf, so it can be a little more messily cut.


Everything cut out and the plasma panel set in to check the fit.

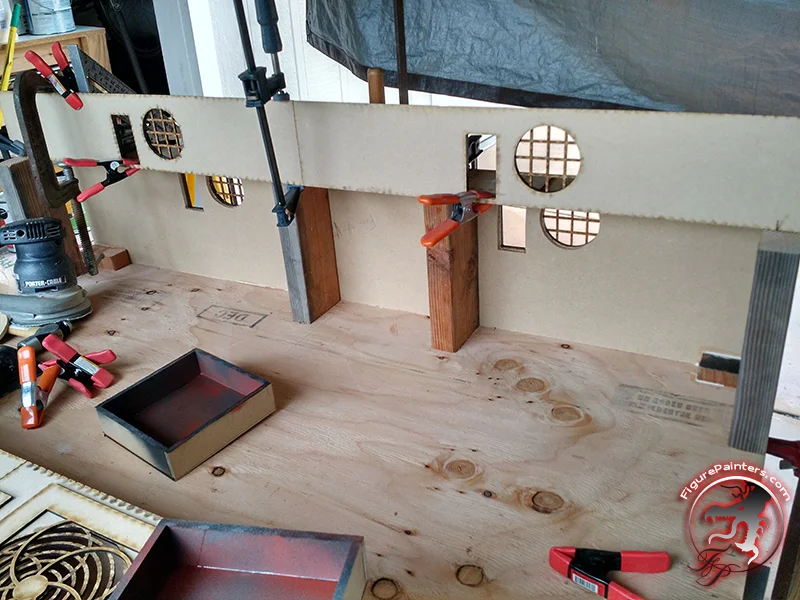
Now to glue it all together!
Using wood glue I attached the top laser cut panels to the 1/4" mdf sub layer.


One of the "hills" for the table. Having flat terrain at least for hills makes for much cleaner play on these fancy finals tables.

Here are some of the other parts going together for the table.


Movable walls for the table too.

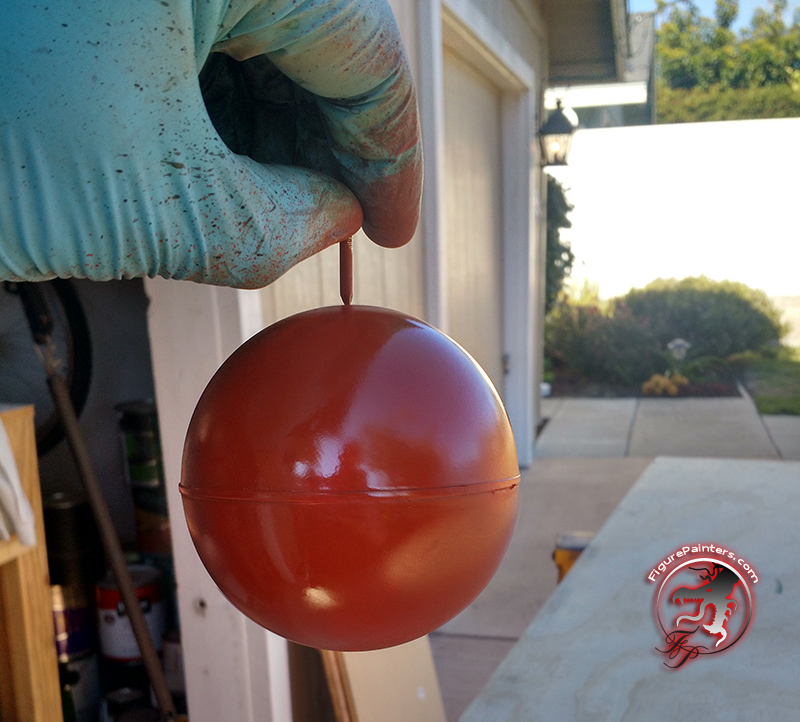
For the side board I am going to have floating orbs with Cephalyx runes on them. I think these will be super cool all lit up red with runes, light and smoke around them.

And starting to repaint them. Bonus, since they are magnetic I can just stick it to a nail and spray paint it.

Sunday morning back outside working on the table.
Now that the table top is glued together it is time to build the box around it.
This picture is of the box under the lower side board. Typically I make a 4x4 center table, then two removable side boards. This way everything fits in the back of the truck and the flat center tables can be stacked and the side boards can be stacked on their sides. If space was not such and issue, or I had a large space to store them making them as one piece would be easier.

The interior of the table will have stand-off supports to help support the table top as people lean on it.
Here the stand-offs are located and measured. I will need to drill holes in the top and the bottom to secure them. The table top will be removable just in case something needs to be fixed as some point.


Stand offs glued and screwed to the bottom of the table.

Table tops mounted on the boxes.


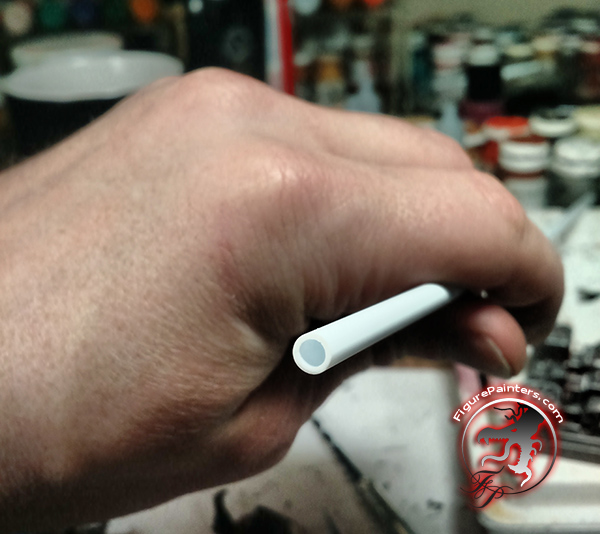
This is the large center inset for the plasma panel.

Starting to lay out the larger side board.

Each one of these squares will have a bio pod in it with the larger bio chamber in the middle.

At this point I need more MDF so will have to wait to get some the next day.
Putting the top on the large bio chamber. I am just using thick craft glue. It bonds pretty well, especially on something that will not be knocked around a bunch. Super glue would cloud the plastic and epoxy is just a mess to work with in this application.


With it on it is not perfectly level. But it is good enough for the glue to hold.
Using some painted plexi card strip I am covering up the gap and adding a little extra strength to holding on the top.


Here are some of the more than 20 smaller bio pods the table will have on it.
Showing what the top looks like of the bio pod and where the top wire comes down through.

So I had some older polyester resin I wanted to use up on this project. Fortunately I tested it just one bio chamber. Lets just say the plastic did not like it at all....
That is the plastic itself actually cracking. Not due to heat or anything. Just some kind of chemical incompatibility between the two.


Definitely not going to use any more of this. Might still use the pod on the table. It could be a broken one or something.
For my next test I am using some smooth-on crystal clear two part resin. Hopefully this will work. I mixed too much though, and not wanting to waste any I filled three more bio pods.

Here is a picture of the rest of the Bio pods filled with clear resin.

Wiring up the two LEDs of each pod to each other after I put the tops on all of them.

So after years of drought here it finally started raining. But of coarse the three weeks right before LVO it has been raining a ton. My garage is only a single wide and there is not a ton of room inside to have tools out for working on the table. So fun times...

This is going to be the larger side board where most of the bio pods and the large bio chamber are going.
This is the first vertical face of the side board.

Testing the overlap using the smaller side board for how the larger side board will overlap the main table slightly.

Attaching the vertical face to the larger side board.

Clamping it all down to give it some time to dry.

On the smaller side board there are some larger vents. I am not running smoke to them, but they will have some flickering light under them. These boxes are to help make the light a little more visible and hide the rest of the inside of the small side board. There will be some smaller bio pods over here too that will be light.

This is the side board top plate upside down.

2nd step of the larger side board being attached.

The side board has doorways on each level. I built a little box for each that will attach to the back that will make it look like a hallway. They each have a light in them too.

It is dark and cold outside (at least for California, my god it is under 50 degrees) so time to move into the garage and work on the piping for the smoke machine.
Starting the layout the piping in the main board. This will pipe the smoke to cups that are under the 4 center vents on the table.

Here are the cups. I am using pvc pipe end caps for these.


The cups installed into the innards of the table.

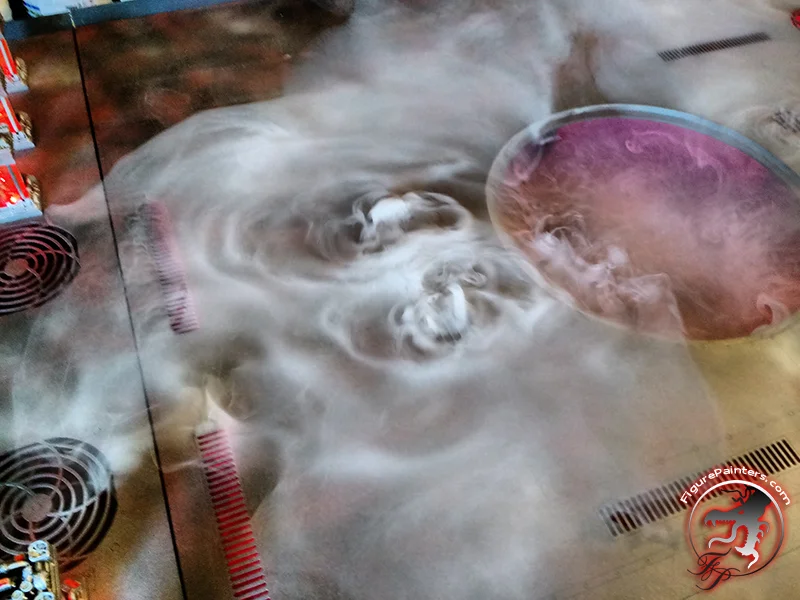
Smoke from smoke machines comes out pretty hot. Thusly it will tend to rise. So to help the smoke "cling" to the table I am going to have a small insulated lunch box filled with dry ice that the smoke will run through first.
The lunch box and smoke machine will be living inside the larger side board.


Now to test out the smoke machine! I don't have any dry ice right now so I just have the smoke machine pushed up against the pipe for the main table. I am quite excited (at least for me, I had a little smile) to get this point as I had an idea in my head of what this would look like, but had no idea if it would actually work.
It looks to work quite well!


Once I cool the smoke down some it should stay lower to the table.
That is it for tonight. More pictures to come tomorrow night.
Now that I know the smoke is not a lost cause I painted the in the interior grey. It could have been black, but I had a can of grey laying around that could be used up.
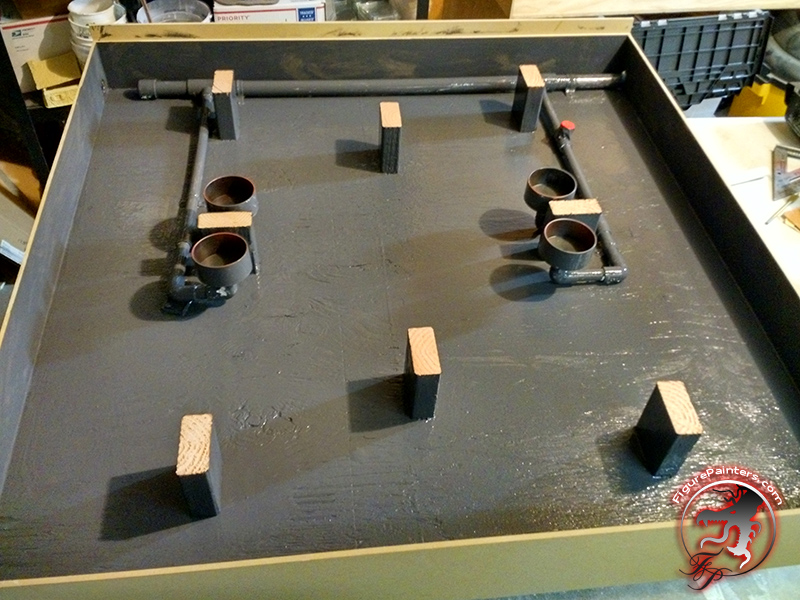
Once the grey was dry I took the bronze rattle can spray paint and sprayed it around a little bit to break up the plain grey of the interior. You wont be able to see much of the interior, but it would hurt.

These are the back interior supports of the second level of the larger side board. The thinner mdf needs some kind of backing or support to keep it from sagging.

I used some clamps to help align the edge of the top 2nd level with the face below while the glue dried.

Now it is time to do the piping in the larger side board. I flipped it upside down so I would not have to hold anything. This cups are attached to the underside of the vents on the second tier of the side board.

The assembly that attaches to the vertical vents on the side board. These will have lights in them eventually. I ran out of LED's and probably won't be able to get any before I have to leave for LVO.

All the vents piped up.

And the set up with the smoke machine and the cooler that will have the dry ice. All this will be enclosed inside the side board.

And in case I don't want to use the cooler I can hook the smoke machine right up to the piping. Though the pipes do get kinda hot from the smoke.

The smoke comes out much slower now with all the extra piping added. I might try to add an inline fan at some point to help move the smoke along. But that will have to wait till after the Con.


Now back to working on the front of the side board. I build a backer that will be offset back from the vertical girders. The "U" shaped plastic parts are going to have magnetic floating balls that I pictured before in them.


The center circle in the above picture is going to have a lit recessed Cephalyx symbol in it. Also, the whole area between the vertical girders and the back panel will and piping and such too.

I was getting late so that is about as much as I got done on the table outside.
Back inside I worked on finishing wiring up my bio pods and chamber.
Here is the mess of wire coming out of the bottom the the large bio chamber.

Now cleaning up a bit so I can feed them into the board. I used hot melt to glue the wires in the channels on the bottom of the chamber.

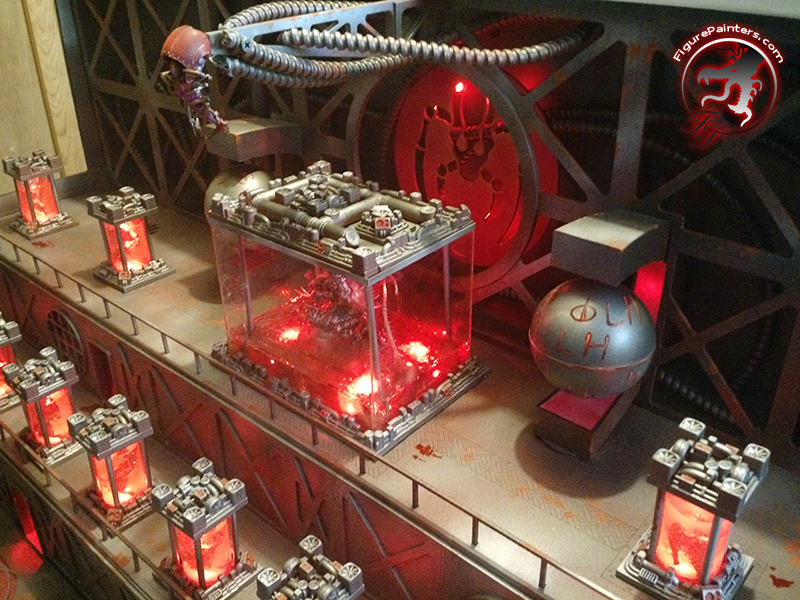
And with lights on!

Here is hopefully a little better picture of the monstrosity. maybe in the future I will get some of the monstrosity heavies and put them in some bio chambers too.


I also painted the floating magnetic orbs. They have runes on them spelling something out...

Test fitting the center Cephalyx logo on the side board. The logo is a metallic red color.

I am adding some piping behind the paneling of the side board. I would like to add more, but I don't really have the time right now for it. But at least it is something to add some interest.

With the girder panels in.

First coat of antique bronze spray paint.
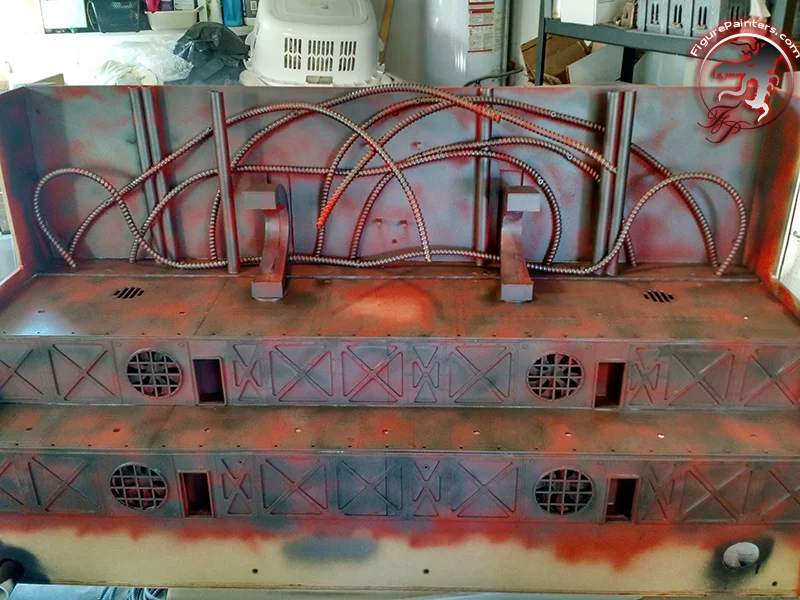
Same thing on the main table.


And a lighter coat of aluminum color spray paint.

Putting in the girder panels

Here is Cyphon overseeing his bio factory. He is magnetized so he can be safe during transport. I am going to add some smaller tubes to the back of him that meld a little better into the larger tubing.

Here you can see the tubing coming up to him. I have an extra LED that I think I might add inside of Cyphon so he will glow too. I need to get a bunch more LEDs to outfit the rest of the table, but that will have to wait till after LVO.

The top put on the side board and weighted down while the glue dries.

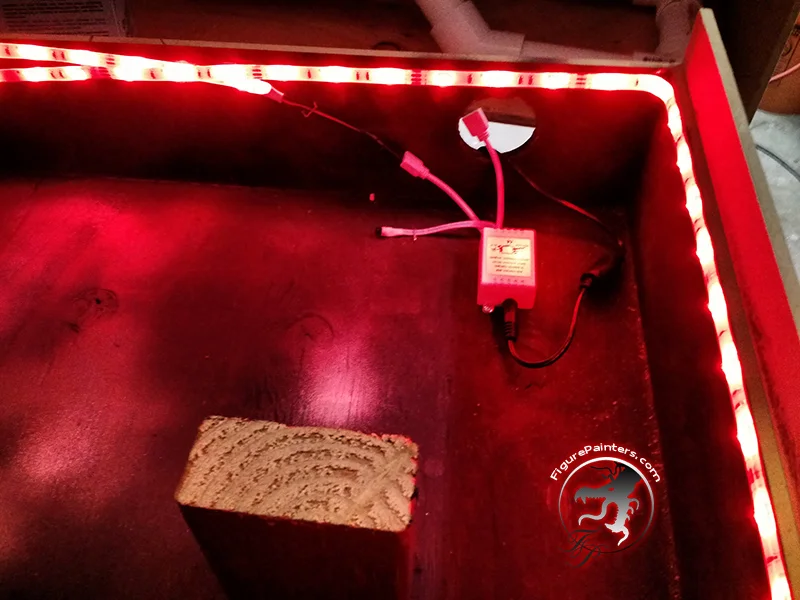
Using strip LED lighting I am going to make the inside of the main table glow. The lighting unit can make it any color, flash and pulse. Just like the CoC table. Though it will probably just stay on red. If I am using just the main table and no side board I can always make it blue so it will match the blue of the plasma panel.
Here is the LED control unit with the IR remote receiver.
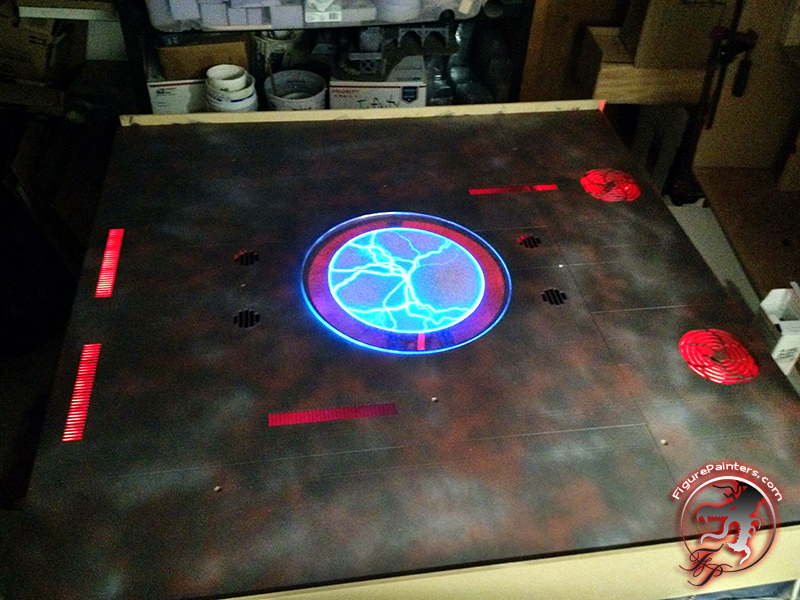
With the play surface on and the vents glowing.

The Plasma panel inserted!
And here is a quick video of what the plasma panel and lights look like.
I am moving along on the table. I have to have it finished up by Monday! Here are two quick teaser pics. I don't have too much more I need to do. I have the terrain and smaller detailing to do then it should be all done.
I have to open up the hole a little for the plasma panel.


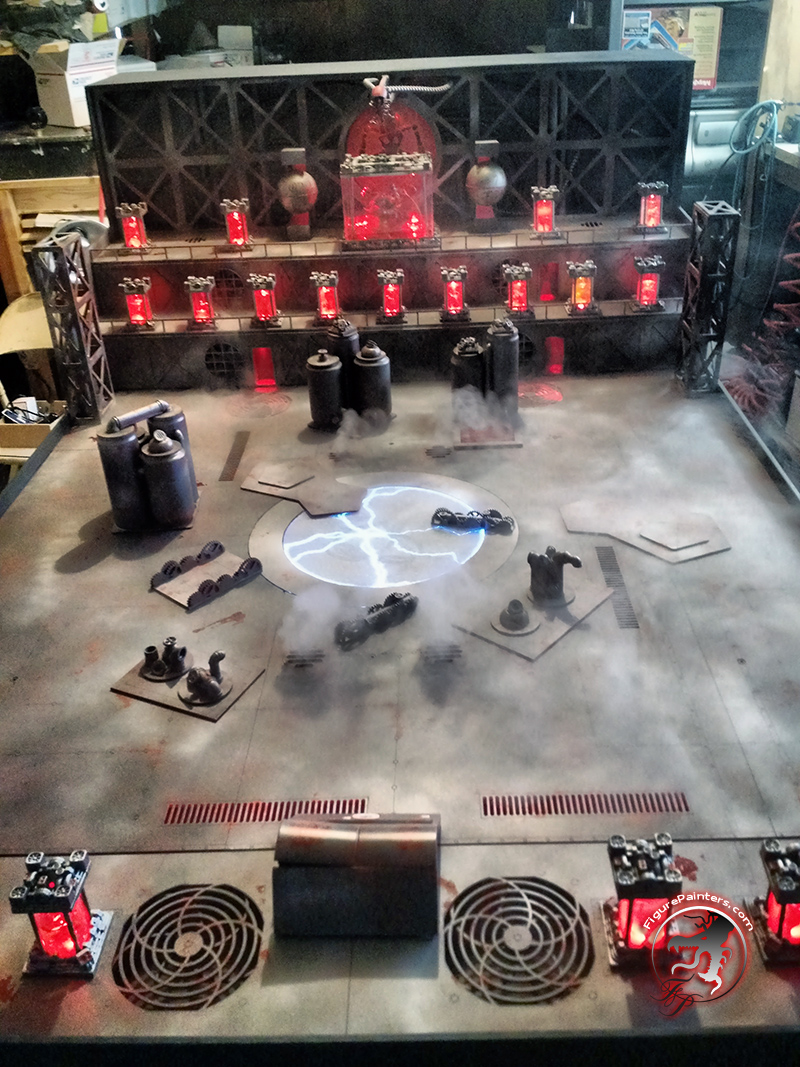
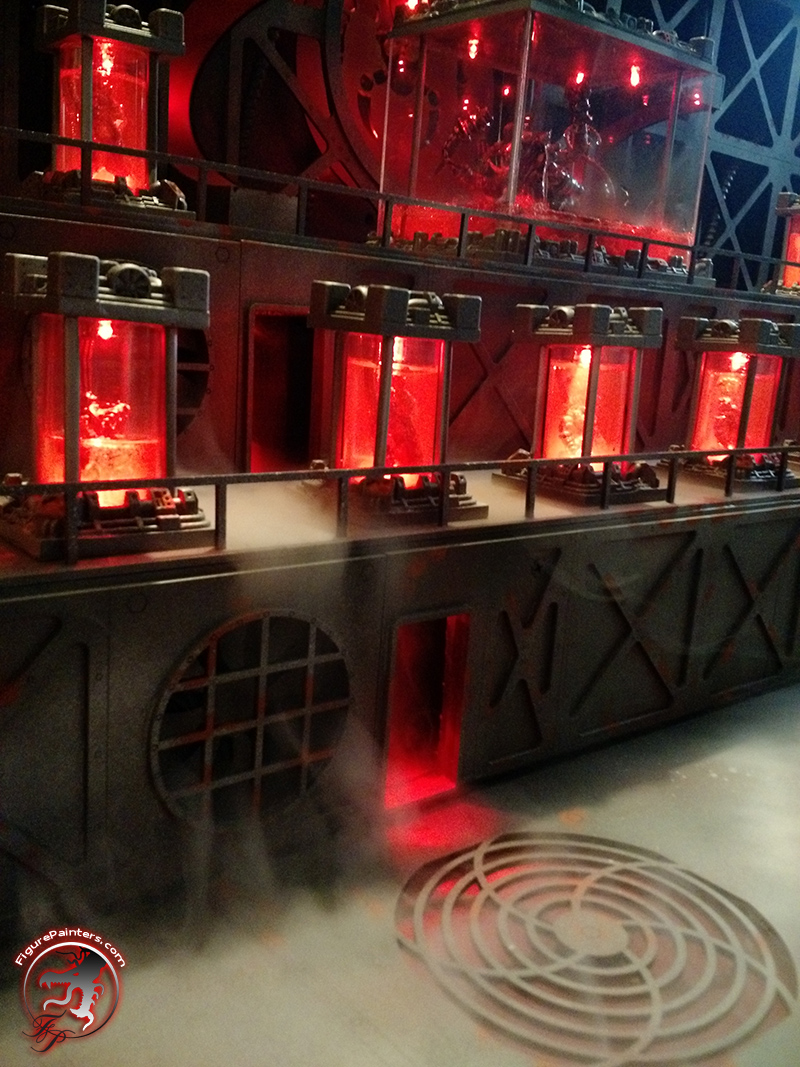
Table is all finished up! I am packed up and headed to LVO in the morning for a few days of vacation before the con starts.
I will finish up the tutorial part of this once I get back. But for now here are some finished pictures of it with the smoke and lights.


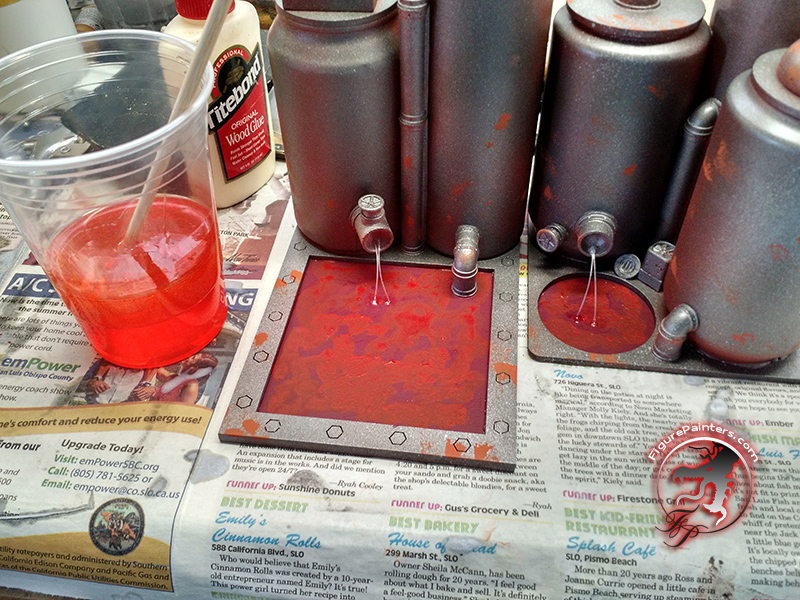
Working on some terrain for the table. These are going to be pools of processed liquid, blood and guts, or maybe food. Depends on what you want it to be....
I started off with painting the inside of the pool a mottled red. This will add some depth and texture to the pool once the resin is in. I tinted the clear resin with some red tamaya clear paint. The pouring liquid I have a support of fishing line.
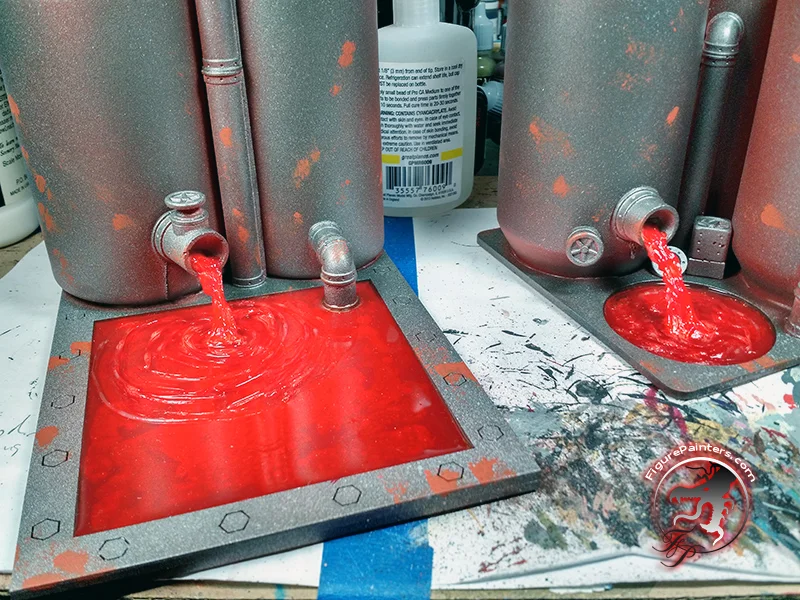
Clear resin poured in and curing.

Resin set up and ready for some sculpting gel.

Using acrylic sculpting gel I made the pouring liquid, along with waves in the water.

And the acrylic gel on the other can.

Once it dried I painted over with some of the clear Tamaya red paint. IRL the pouring water is semi transparent.

I re-painted a chess clock to match the board too. I tried to make bloody finger prints on the clock paddles, but they just turned into smudges.

And the objectives and flags for the table.

Here are some pictures of it all together. The pictures are a little grainy because of the lower light in the garage and using a camera phone. Once I get back from LVO I am going to add a few more lights as I ran out, do some re-wiring and then take some better pictures.


With the smoke running.

The pipes on the round bases on the rectangles represent "forests".


Some pictures of the table being played on at LVO. There are more pictures of LVO at https://www.facebook.com/pg/LVOWM/ph...66015596849988


